Building a magnetic polisher. Stage 3: the test

About making you own...
User avatar

Topic author
MoFo
FOTA Vice Chairman
FOTA Vice Chairman
Posts: 1589
Joined: Mon Jun 29, 2009 4:34 pm
Status: Offline

Building a magnetic polisher. Stage 3: the test

Post by MoFo »

Right, so as I've mentioned elsewhere, I've been looking into making my own magnetic polisher. Here is my plan. All comments are welcome.

Fundamentally, a magnetic polisher is a fairly simple device: a bowl full of polishing medium sits on a platform above a motor, spinning a plate with magnets on it. There's nothing terribly complicated about it (in theory), which is part of the reason why I don't really want to by a seemingly-overpriced, off-the-shelf unit. The other reason is, I'm cheap. :) There are a few pages out there discussing how to build your own, from the roughly hacked-together, to more professional examples. This, is a particularly good one: http://www.rchristopher.com/tech/tumbler.html

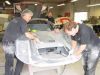
I've spent the past few days trawling through Kijiji, trying to find suitable motors. Preferably something fairly robust (thinking: tool-oriented), relatively slow (1000 - 3000 rpm; no Dremels or Routers), relatively torquey (I don't want it to stall or burn out), easy to mount and preferably with an on-board speed controller. I *thought* I had the perfect solution in the form of a jointer blade grinder:

Image

6" wheel - good size for a polisher. Nice, torquey motor. It even has a convenient, adjustable platform, so I can get a hairline gap between the magnets and bowl. Just pop the guards off, laminate some MDF on the grinding wheel, drill out recesses for the magnets, build a platform and it would be good. Unfortunately, it runs at about 3700 rpm, which, from the feedback here on F1M, sounds like it would be way too fast for white metal. Drat. And because of the style of motor, there's really no way to adjust the speed.

Back to Kijiji. I considered a drill press (mount it upside down with a fabricated platter - again, I can adjust the height easily, just build a housing for it), but I don't want to muck around with belts to control the speed, and prices weren't as low as I'd like. But, while searching through the tools section, I had a brainwave.

:idea:

What about a lathe? I *own* a mini woodturning lathe. It *has* adjustable speed (500 - 3000 rpm - nice range). It comes with a nice, round platter that would be easy to re-purpose with magnets. How hard would it be? After some exploration with a screwdriver and wrench, some headscratching and back-of-the-envelope sketching, here's my current plan:

Image

Turn it 90` so the bed is pointing down. Mount it under some sort of platform. The arbor is threaded on both ends, even though it's only meant to be used on the bed side. The other side is accessible through a removable cap (good), but it has a different screw diameter (bad). So all I need is either a new faceplate with the appropriate threading, or an arbor adapter to go from the 5/8" spindle to my existing 1" face plate and I'll have the mechanical portion all sorted out. Then it's a straightforward matter of building a disc with magnets, and a height-adjustable platform.

I think it just might work!
Last edited by MoFo on Tue Feb 06, 2018 3:38 pm, edited 2 times in total.
Je ne regrette rien.
User avatar

billgtp
FOTA Chairman
FOTA Chairman
Posts: 2409
Joined: Sat Jan 26, 2002 5:27 pm
Favorite F1 Team or Driver: Chapmans Lotus, James Hunt
Location: Anza ca.
Status: Offline
United States of America

Re: Building a magnetic polisher. Stage 1: The plan.

Post by billgtp »

I think it just might work! After all of this why not just buy one that works
User avatar

Topic author
MoFo
FOTA Vice Chairman
FOTA Vice Chairman
Posts: 1589
Joined: Mon Jun 29, 2009 4:34 pm
Status: Offline

Re: Building a magnetic polisher. Stage 1: The plan.

Post by MoFo »

Polishing media: $30
Magnets: $25
9" bowl: $5?
Replacement lathe face: $15

Total cost for homemade 9" polisher: $75


Cost of 9" polisher from OttoFrei: $1700

That's why.
Je ne regrette rien.
User avatar

CBartholomew4677
FOTA Chairman
FOTA Chairman
Posts: 3178
Joined: Sat May 14, 2005 8:50 am
Your Name: Chris Bartholomew
Favorite F1 Team or Driver: Forza Ferrari!!!
Location: Michigan, USA
Status: Offline
United States of America

Re: Building a magnetic polisher. Stage 1: The plan.

Post by CBartholomew4677 »

I admire your ingenuity and creativity in making this yourself. The large magnetic polishers are really expensive, but the small~medium size ones are not so bad. However, it's fun, and a sense of accomplishment to make something yourself, and I think you can pull it off.

Once you get the drive squared away and start planning the bowl portion, please keep one point in your mind. The key is to keep everything moving (parts, pins, fluid) to get good consistent working on the parts, so the bowl should be designed to help flow and movement in the bowl when running. As someone had mentioned, there are little ribs on the bottom of bowls of current units on the market, which help create turbulence and swirling in the fluid, as well as the donut shape.
Just my advice. Sorry if I'm repetitive, I just want to see you succeed.
Cheers,
Chris

drledford93
FOTA Chairman
FOTA Chairman
Posts: 3594
Joined: Fri Jul 24, 2009 10:01 pm
Location: Kentucky
Status: Offline

Re: Building a magnetic polisher. Stage 1: The plan.

Post by drledford93 »

MoFo wrote:Cost of 9" polisher from OttoFrei: $1700

That's why.
Yikes! That's nowhere close to what I paid for my 5" model (or some diameter close to that).

I'm very happy for you to be doing this--I'm a life hacker myself but not in the engineering sort of way. Keep it going, I'd like to see where this takes you!

Daniel
User avatar

PeteJ
Major Constructor
Major Constructor
Posts: 1087
Joined: Wed Jan 02, 2002 9:04 pm
Your Name: Pete Johnson
Favorite F1 Team or Driver: Lotus Jim Clark
Location: San Marcos, Ca
Status: Offline
United States of America

Re: Building a magnetic polisher. Stage 1: The plan.

Post by PeteJ »

Holy crap! $1,700! No kidding. Why not just buy three of the little ones and stack them! :lol: Just curious, why do you need one that big? I just did a bunch of parts for the 1:32 scale zero in my small one and it took about 4 loads but it worked fine.
User avatar

Topic author
MoFo
FOTA Vice Chairman
FOTA Vice Chairman
Posts: 1589
Joined: Mon Jun 29, 2009 4:34 pm
Status: Offline

Re: Building a magnetic polisher. Stage 1: The plan.

Post by MoFo »

Bit of a bump, but F1Modlz' thread reminded me that I really should update this...

Why so big? I want to do some 1/12 MFH kits, so the extra size will come in handy. Plus, since it's not costing me anything (in fact, it's saving money vs. even a small unit from Otto Frei and the like), I'd rather have more capacity than less.

Anyway... update. I've got my magnets. I've got a bowl (from a food processor - already has a cylinder in the middle to prevent dead spaces). I've got MDF for my magnet plate. I'm just waiting on my tumbler pins and soap before it all comes together. I'm hoping to get the mechanicals done this weekend.
Je ne regrette rien.

Sennafan
Constructors Champion
Posts: 1311
Joined: Sun Mar 07, 2010 12:59 pm
Favorite F1 Team or Driver: Ferrari

Mansell
Location: Houston
Status: Offline
United States of America

Re: Building a magnetic polisher. Stage 1: The plan.

Post by Sennafan »

I've prepped 4 of 1/12 MFH kits with my $350 small one and except for larger parts that can be hand polished anyway, every piece went in, engine, tranny, etc

Alex Hague

But I like your engineering and ingenuity
User avatar

jmpsebring
FOTA Vice Chairman
FOTA Vice Chairman
Posts: 1903
Joined: Tue Jan 08, 2008 10:35 pm
Location: Wash DC
Status: Offline

Re: Building a magnetic polisher. Stage 1: The plan.

Post by jmpsebring »

Look'n good! Would a blender make a good multi speed, base?
User avatar

Topic author
MoFo
FOTA Vice Chairman
FOTA Vice Chairman
Posts: 1589
Joined: Mon Jun 29, 2009 4:34 pm
Status: Offline

Re: Building a magnetic polisher. Stage 1: The plan.

Post by MoFo »

Geez I'm slow...

But.

I love it when a plan comes together! :mrgreen:

Image

Getting close now. Various other projects have taken up my modelling time, but I finally forced myself to get cracking on the tumbler. Much sweat, some blood, several curse words later, and it's very nearly ready to run.

Image

The steps thus far:

Marked out an appropriately sized circle on some scrap 1" MDF. Cut rough shape on a band saw. Sketched out a template for mounting the bolts and magnets to this MDF circle, then drilled the various holes. Everything has to be laid out as precisely as possible to maintain balance. Also: the bolt holes have to be countersunk into the face of the MDF, so they're not protruding (natch).

Image

Mount everything to the lathe's face plate. Sounds easy. Was incredibly annoying. Face plate = metal. Magnets = strong. Bolting the MDF disc to the face plate is a piece of cake. Separating the magnets was f.r.u.s.t.r.a.t.i.n.g. Accidentally wave one magnet too close to another (read: within about four feet of each other) and THWACK! I'll spare the gory details, but suffice it to say, the magnets need to be mounted with alternating poles (N/S/N/S), and you need to vary the spacing (so the vertical pair need to be closer to the edge than the horizontal pair). This keeps the pins flipping around and increases the circulation of the pins.

Then the face plate gets mounted onto the lathe.

Image

The final big hurdle is mounting the lathe to the wall. It's pretty straightforward - just locate the bolt in the hole - just massively complicated by trying to support a 60lb. lathe while lining up screw holes. In the end, I mounted a couple of locating blocks on the wall, to help with the process. Fortunately it's in a hidden area in an unfinished basement, so it's not too unsightly.

The last step will be to mount the bowl. I'm debating how best to do this.

Image

My original plan was to 'dangle' the bowl from the lathe's spindle; attach the lid to the dead centre (top), so I could mount the bowl then lower it down over the magnets (bottom). The benefit here is that I can lower it as close as possible to the magnets, maximizing the magnetic effect. I'm a little worried about it slipping, though, which would be very, very bad. So now I'm considering mounting some sort of platform over my magnetic disc and going with a simpler layout. Benefit to this method is that I can mount a variety of bowl sizes, though it may reduce the magnetic field slightly.

Cost breakdown:

Magnets: $17
Bolts: $2
.3mm pins + soap: $30
Drill Press to precisely drill holes: $20(! via Kijiji. Score!)
Lid for food processor *or* table: $20.
MDF: scrap
Lathe: already owned

So I'm under $90 for the whole project. Which is 1/3 the price of a basic magnetic polisher, and way cheaper than a comparably sized one. Plus, mine has variable speed. Not bad, if I do say so myself. :) (plus, I really shouldn't count the drill press...)

-------

@jmpsebring Not sure about a blender. It would depend on the RPMs, but I'm *guessing* they might be too high. Remember, I ditched the grinder idea because it spun at 3700 RPM; I suspect most blenders will max out at 10x that speed. Something like a variable speed bench grinder might be okay, though.

The other thing to consider (which, I'm glad I abandoned the grinder idea now)... You're using strong magnets, with alternating polarity, spinning pretty fast. That creates and electrical field, which will heat up metal. So if your blender's case is metal (or whatever you use for a motor), there's a decent chance it will overheat, and may even melt. I read one home builder's experience where they used a metal tray to support the bowl, and after just a minute or two of spinning the magnets, the tray was too hot to touch.
Last edited by MoFo on Tue Feb 06, 2018 3:40 pm, edited 1 time in total.
Je ne regrette rien.
Post Reply