Cooper Climax T-51....'59 British GP


Re: Cooper Climax T-51....'59 British GP
Your work is inspiring- truly "modeling". What I do, by comparison, feels like putting a very clever puzzle together. Thanks for sharing your process!
-
 harveyb258
Topic author - FOTA Vice Chairman

- Posts: 1950
- Joined: Wed Dec 19, 2012 4:36 am
- Location: UK
- Status: Offline
Re: Cooper Climax T-51....'59 British GP
Thanks for the kind words, lads!
I'm pleased that you are still enjoying!
Cheers, H
I'm pleased that you are still enjoying!
Cheers, H
-
 Eagle50
- FOTA Chairman

- Posts: 4038
- Joined: Sun Apr 03, 2011 12:05 pm
- Location: Tokyo Japan
- Status: Offline
Re: Cooper Climax T-51....'59 British GP
Fantastic tranny top, Harvey. Good to see you're still workin' on this.
Cheers, Chris
Cheers, Chris

Re: Cooper Climax T-51....'59 British GP
What an outstanding update Harvey!
Supernice work as usuall, i missed an update but now i`m running out of words! It was worth each minute finaly
Supernice work as usuall, i missed an update but now i`m running out of words! It was worth each minute finaly
Take a stand!
-
harveyb258
Topic author - FOTA Vice Chairman
- Posts: 1950
- Joined: Wed Dec 19, 2012 4:36 am
- Location: UK
- Status: Offline
Re: Cooper Climax T-51....'59 British GP
Good evening gentlemen.
Chris and gpmodels....many thanks lads
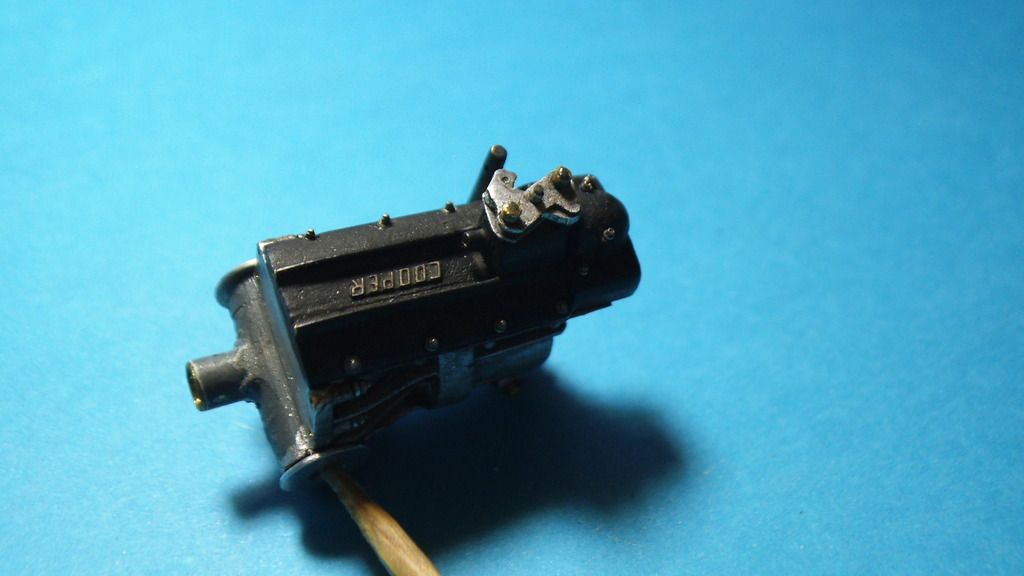
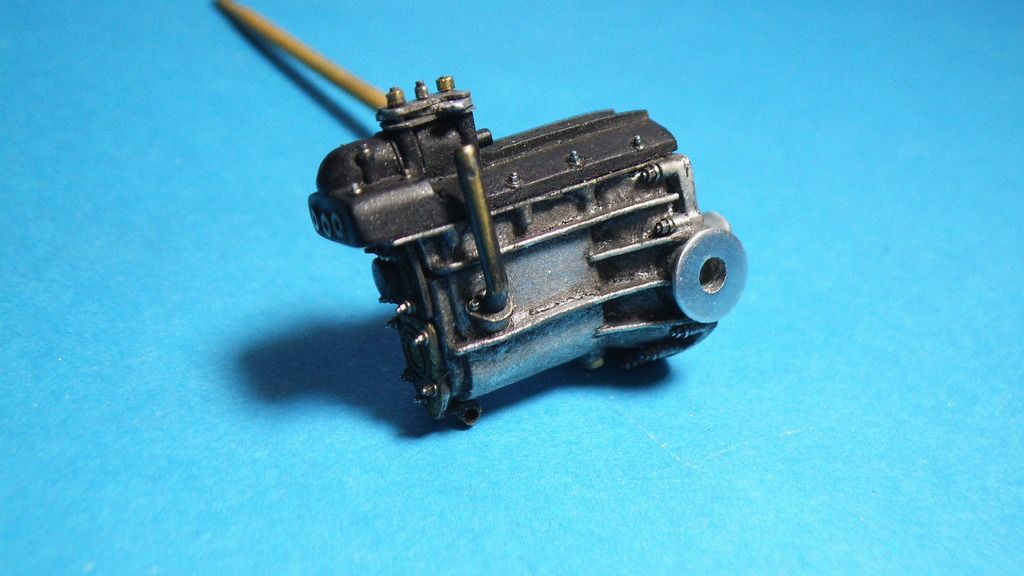
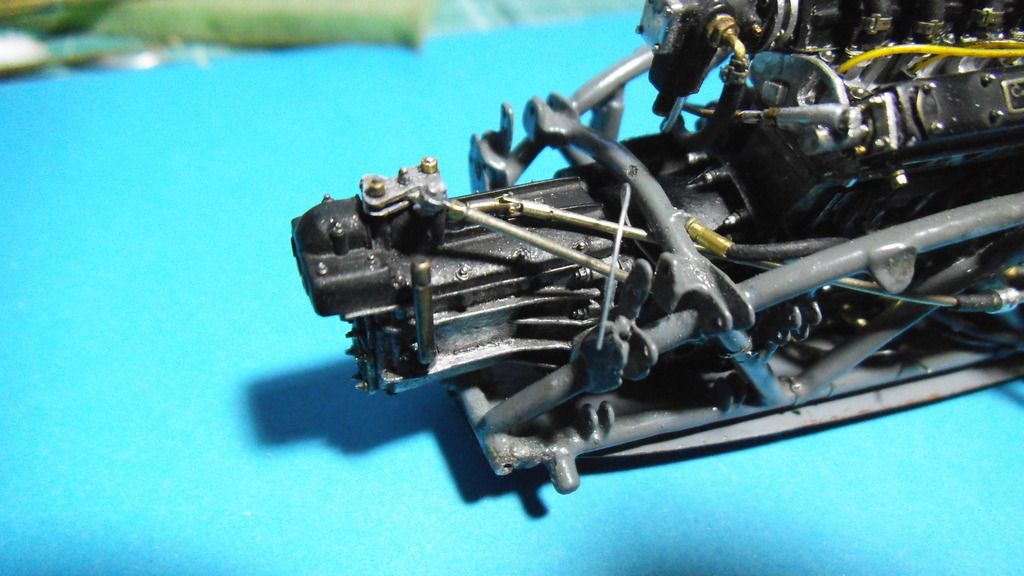
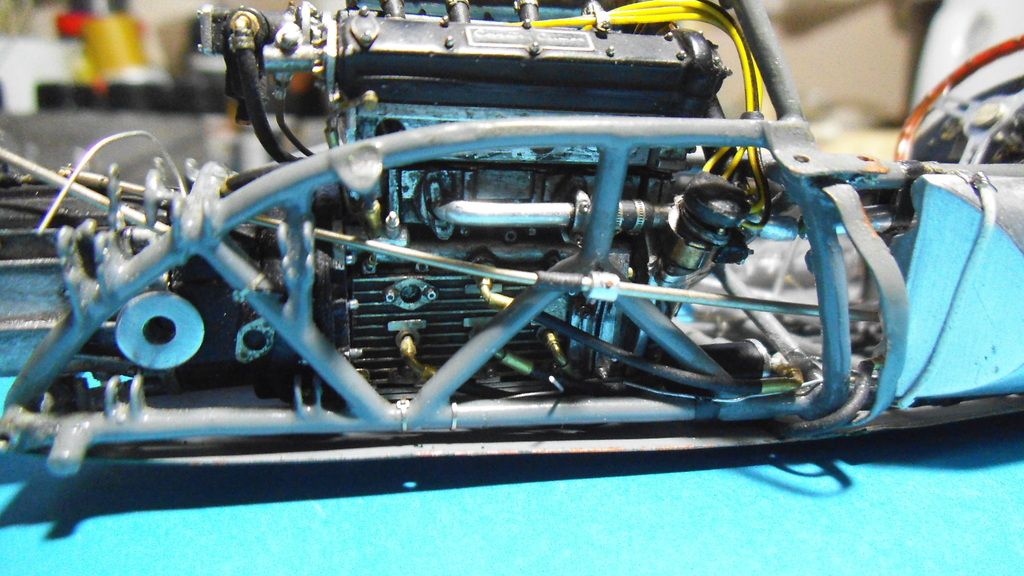
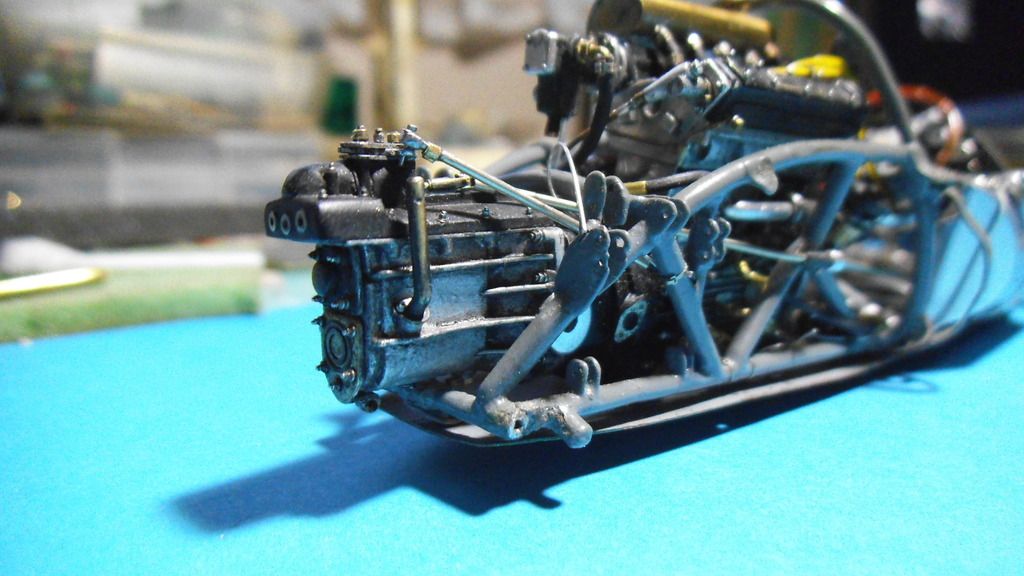
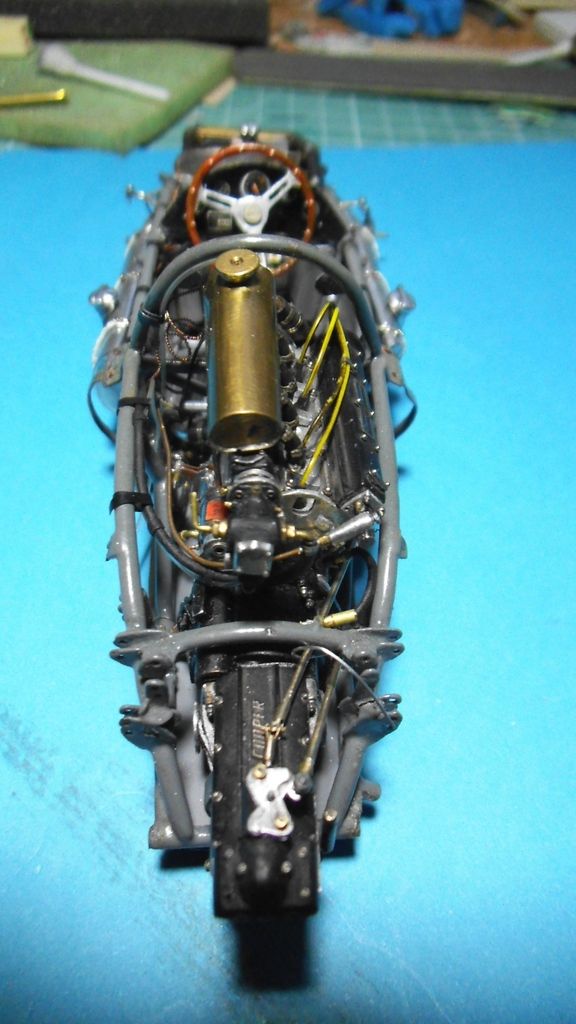
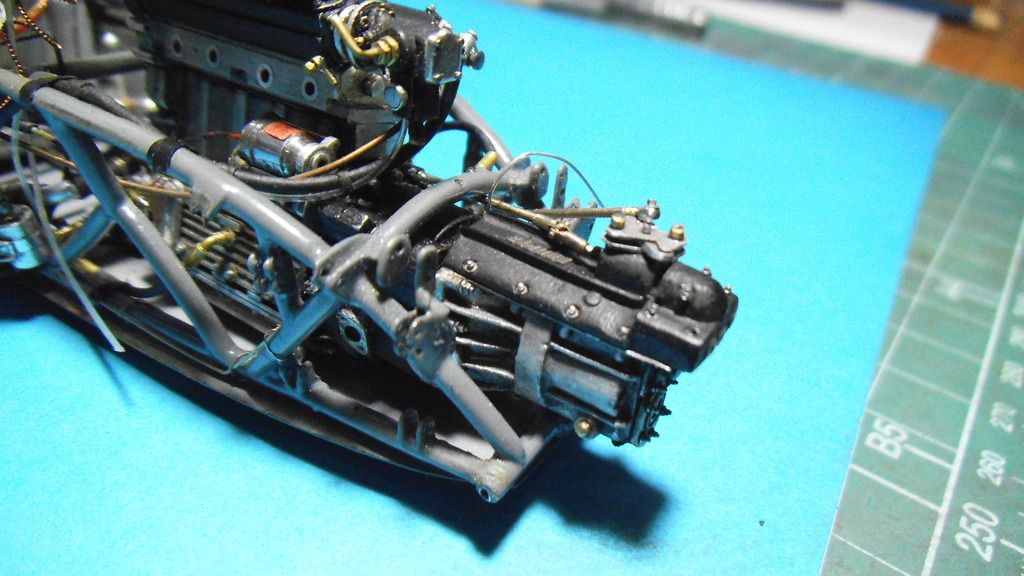
I have some more progress to share with you all......the gearbox is now completed and firmly mounted to the bell-housing, as are the shift-rods, so I'm a happy chappy now!:D Still need to make the gearbox anchor brackets for the rear-end, but that's no biggie.
The selector plates are made from scrap ali and the 3 nuts on top made from ali and brass tubes, filed to shape.
The rest of the hardware is from T2m.
The selector rods are 0.8mm nickel-silver tube from Albion Alloys, while the universal-joint was created from 1mm nickel-silver tube, drilled and filed out. These are fully-articulated using 0.4mm brass tube and then intersected at 90degrees with a 0.3mm rod...very fiddly, especially at this scale.
The breather tube on the side is made from 1.2mm brass tube with a thin sliver of 1mm brass rod, 0.4mm holes drilled around the top.
Well, that's all for now, folks!
Thank you for watching my endeavours and Merry Christmas everybody
Cheers, H
Chris and gpmodels....many thanks lads
I have some more progress to share with you all......the gearbox is now completed and firmly mounted to the bell-housing, as are the shift-rods, so I'm a happy chappy now!:D Still need to make the gearbox anchor brackets for the rear-end, but that's no biggie.
The selector plates are made from scrap ali and the 3 nuts on top made from ali and brass tubes, filed to shape.
The rest of the hardware is from T2m.
The selector rods are 0.8mm nickel-silver tube from Albion Alloys, while the universal-joint was created from 1mm nickel-silver tube, drilled and filed out. These are fully-articulated using 0.4mm brass tube and then intersected at 90degrees with a 0.3mm rod...very fiddly, especially at this scale.
The breather tube on the side is made from 1.2mm brass tube with a thin sliver of 1mm brass rod, 0.4mm holes drilled around the top.
Well, that's all for now, folks!
Thank you for watching my endeavours and Merry Christmas everybody
Cheers, H
-
 vanhookvintage
- FOTA Chairman
- Posts: 2121
- Joined: Sun Sep 16, 2012 4:34 pm
- Your Name: vanhookvintage
- Favorite F1 Team or Driver: Ferrari
- Location: Upper Black Eddy, PA USA
- Status: Offline

Re: Cooper Climax T-51....'59 British GP
Merry Christmas, Harvey. Happy Hanukkah, too.
This is still my lookout when I log onto F1M, and am always happy to see a new post from this endeavor. May 2017 bring you a couple of DCOEs LOL. Can't wait!
Cheers,
Greg
This is still my lookout when I log onto F1M, and am always happy to see a new post from this endeavor. May 2017 bring you a couple of DCOEs LOL. Can't wait!
Cheers,
Greg
"Everyone dreams of driving a Ferrari, it was my intent from the start." Enzo Ferrari
-
 Starr
Starr
- Major Constructor

- Posts: 1060
- Joined: Fri Mar 18, 2011 2:31 pm
- Location: New Hampshire - USA
- Status: Offline
Re: Cooper Climax T-51....'59 British GP
Hi Harvey,
Good to know you have the Cooper on your bench and that you are making progress with it. And what a progress! It is a joy and a learning experience to follow your w.i.p.
Thanks my friend,
Cheers,
Starr
Good to know you have the Cooper on your bench and that you are making progress with it. And what a progress! It is a joy and a learning experience to follow your w.i.p.
Thanks my friend,
Cheers,
Starr
Classic Plastic Model Club - Lowell, MA
-
dmandam
- F1 Test Driver

- Posts: 201
- Joined: Fri Apr 01, 2011 9:12 pm
- Your Name: DMANDAM
- Favorite F1 Team or Driver: Senna
- Location: Australia
- Status: Offline

Re: Cooper Climax T-51....'59 British GP
Merry Christmas Harvey!
Brilliant work as always.
Can you elucidate a little more, please, on just how you made the U joints?
I have a couple of them to make for the Van Diemens and am just thankful that I am working in 1/12th!
David M
Sydney, Straya
Brilliant work as always.
Can you elucidate a little more, please, on just how you made the U joints?
I have a couple of them to make for the Van Diemens and am just thankful that I am working in 1/12th!
David M
Sydney, Straya
-
Eagle50
- FOTA Chairman
- Posts: 4038
- Joined: Sun Apr 03, 2011 12:05 pm
- Location: Tokyo Japan
- Status: Offline
Re: Cooper Climax T-51....'59 British GP
Wow, 'working' U-joint gear linkage! Amazing!!
Cheers, Chris
Cheers, Chris
-
harveyb258
Topic author - FOTA Vice Chairman
- Posts: 1950
- Joined: Wed Dec 19, 2012 4:36 am
- Location: UK
- Status: Offline
Re: Cooper Climax T-51....'59 British GP
Thank you all for your kind words...much appreciated, guys!

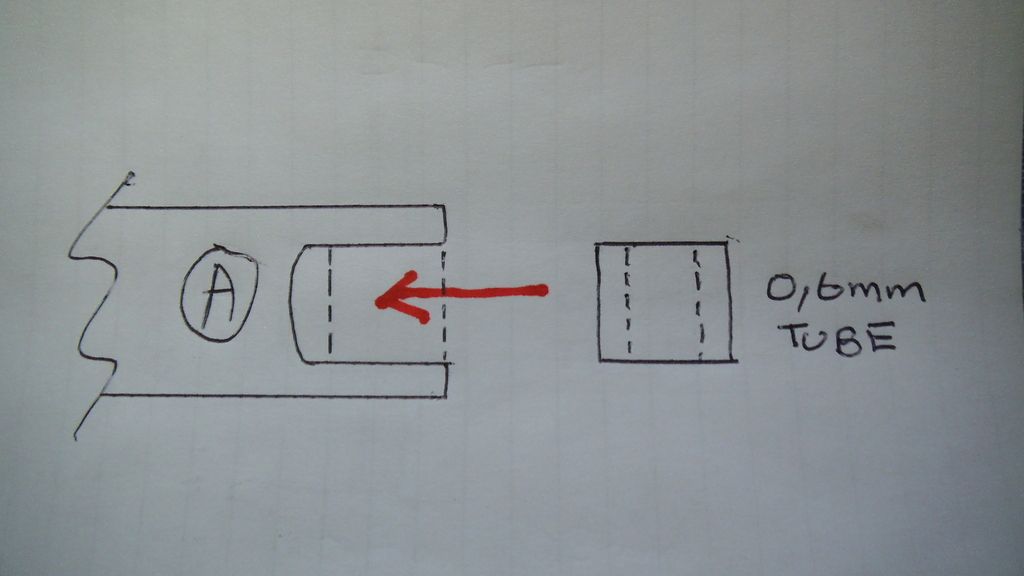
To begin with, I took 2 lengths of 1mm nickel- silver tube and carefully drilled and filed out the slot in each piece.
In part A, I drilled a 0,4mm hole....in part B, a 0,3mm hole....
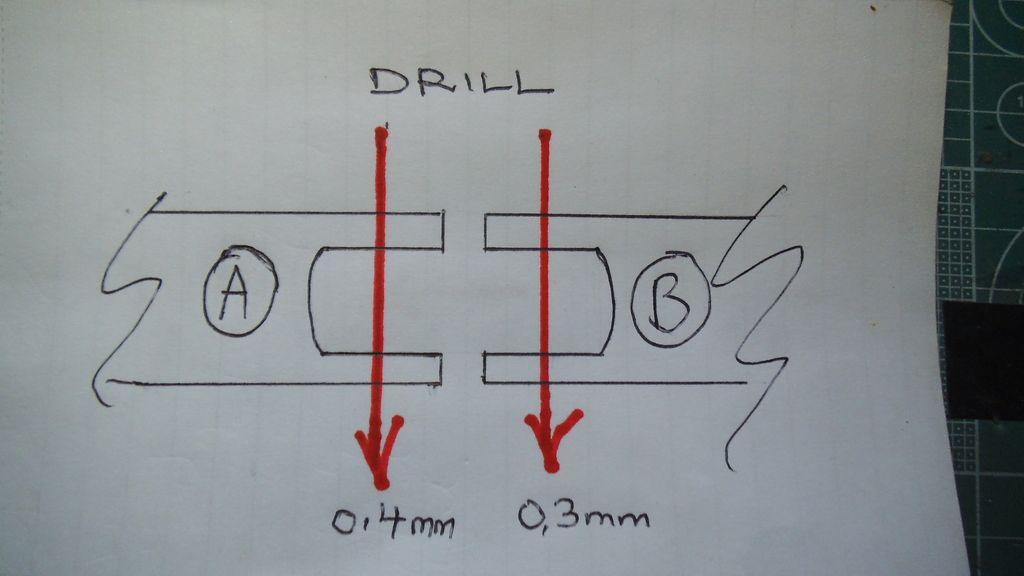
Then cut a 0,6mm length of 0,6mm tube. Put a tiny drop of CA gel inside it. Then you have to quickly insert into part A and pass a length of 0,4mm tube through the whole thing.
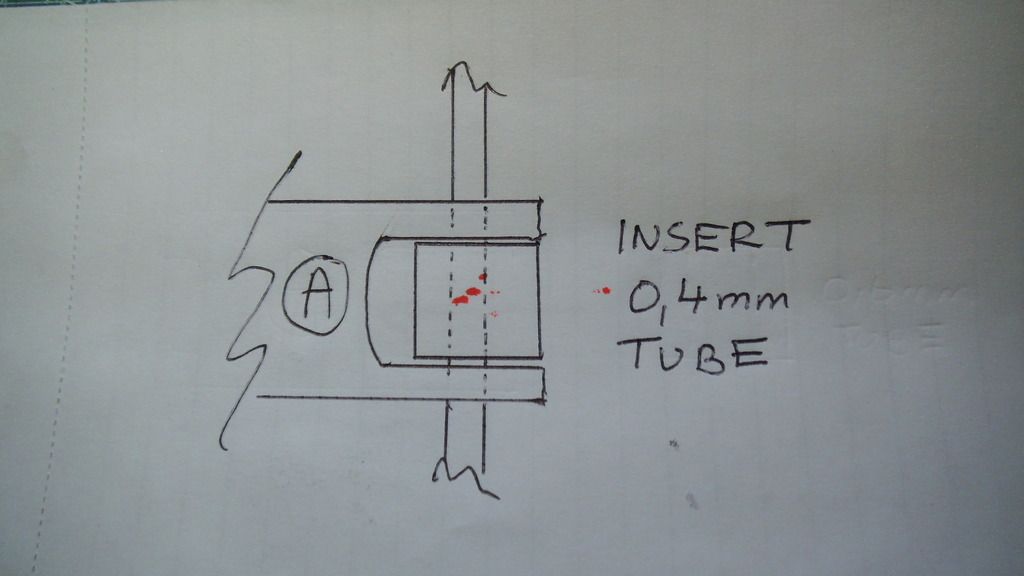
When this is achieved, drill a 0,3mm hole through the centre of the knuckle of the pivot.
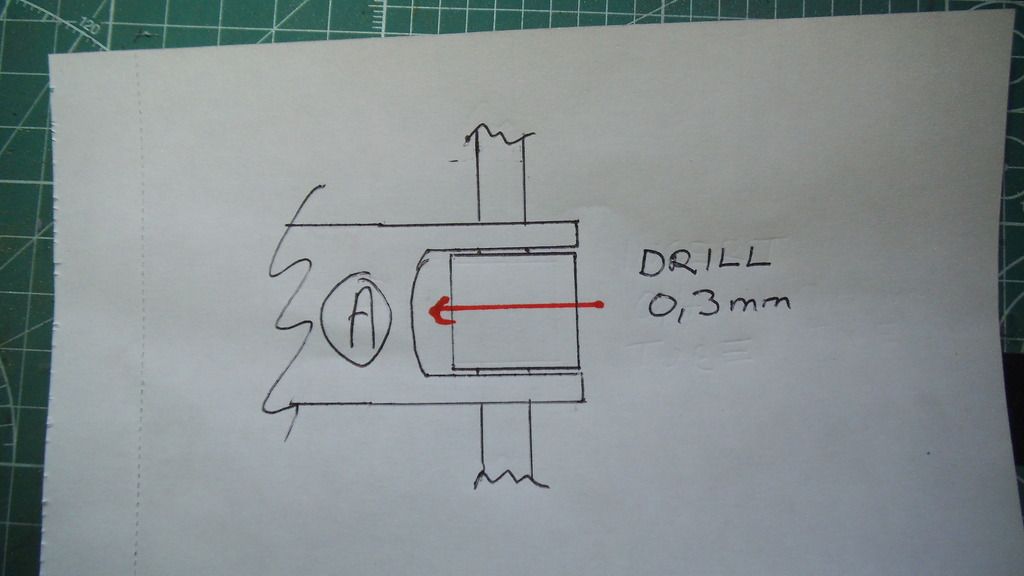
Then, it is a just a matter of attaching part B with a 0,3mm rod through the entire assembly and hey presto....a fully articulated u-joint!
Hope that helps.
Cheers, H
It most definately will, Greg! I see light at the end of the tunnel nowvanhookvintage wrote:May 2017 bring you a couple of DCOEs LOL. Can't wait!
I'm not very good at explaining things, so I'll try with the aid of a couple of sketches......dmandam wrote:Can you elucidate a little more, please, on just how you made the U joints?
To begin with, I took 2 lengths of 1mm nickel- silver tube and carefully drilled and filed out the slot in each piece.
In part A, I drilled a 0,4mm hole....in part B, a 0,3mm hole....
Then cut a 0,6mm length of 0,6mm tube. Put a tiny drop of CA gel inside it. Then you have to quickly insert into part A and pass a length of 0,4mm tube through the whole thing.
When this is achieved, drill a 0,3mm hole through the centre of the knuckle of the pivot.
Then, it is a just a matter of attaching part B with a 0,3mm rod through the entire assembly and hey presto....a fully articulated u-joint!
Hope that helps.
Cheers, H