
WIP: 1/20 Tyrrell P34
-
 chongman
Topic author - Backmarker

- Posts: 318
- Joined: Thu Dec 28, 2006 11:44 am
- Location: Eastern Shore of Virginia
- Status: Offline
Update

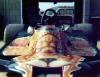
Dash panel gauges installed...boy did that take awhile Now just need to drill a few holes for wires, install the faces for the gauges and paint the panel TS-15 !
Parts Used:
Kit part #C35
Detail Master DM-3227 "Little Gauges" (billet aluminum)
Detail Master DM-3225 60's Style Tachometer (billet aluminum, reduced dia. by .020")
Thanks for looking!
Dash panel gauges installed...boy did that take awhile
Parts Used:
Kit part #C35
Detail Master DM-3227 "Little Gauges" (billet aluminum)
Detail Master DM-3225 60's Style Tachometer (billet aluminum, reduced dia. by .020")
Thanks for looking!
When you're racing, it's life, anything that happens before or after is just waiting Steve McQueen 1971
-
chongman
Topic author - Backmarker
- Posts: 318
- Joined: Thu Dec 28, 2006 11:44 am
- Location: Eastern Shore of Virginia
- Status: Offline
Wip:1/20 Tyrrell P34 (update)
A bit more done at the close of the weekend...
The kit ignition box was modified by cutting off the molded on coil, replacing it with a cut-down Detail Master aluminum coil, then a few holes were drilled and some wires added. The coil was colored red with a Sharpie pen, wow,instant anodize! More detail still to be added later on.

The kit distributor cap was filled with epoxy and marked out for drilling. Alum. rod was then glued in, filed down and a coat of XF-9 Hull Red applied. I buffed off the tips on the caps so you can see it better


And finally a little mockup!

The kit ignition box was modified by cutting off the molded on coil, replacing it with a cut-down Detail Master aluminum coil, then a few holes were drilled and some wires added. The coil was colored red with a Sharpie pen, wow,instant anodize! More detail still to be added later on.
The kit distributor cap was filled with epoxy and marked out for drilling. Alum. rod was then glued in, filed down and a coat of XF-9 Hull Red applied. I buffed off the tips on the caps so you can see it better
And finally a little mockup!
When you're racing, it's life, anything that happens before or after is just waiting Steve McQueen 1971
-
 Shunter
- FOTA Chairman

- Posts: 2906
- Joined: Sat Sep 20, 2003 12:38 am
- Favorite F1 Team or Driver: Alfa Romeo, McLaren, Williams
- Location: Melbourne, Australia
- Contact:
- Status: Offline

RE: Wip:1/20 Tyrrell P34 (update)
Looks great Michael, this is coming along very well.
-
chongman
Topic author - Backmarker
- Posts: 318
- Joined: Thu Dec 28, 2006 11:44 am
- Location: Eastern Shore of Virginia
- Status: Offline
RE: Wip:1/20 Tyrrell P34 (update)
Thanks mate! See you again late in the week
When you're racing, it's life, anything that happens before or after is just waiting Steve McQueen 1971
-
Shunter
- FOTA Chairman
- Posts: 2906
- Joined: Sat Sep 20, 2003 12:38 am
- Favorite F1 Team or Driver: Alfa Romeo, McLaren, Williams
- Location: Melbourne, Australia
- Contact:
- Status: Offline
RE: Wip:1/20 Tyrrell P34 (update)
Hey Michael how is the progress going? Been awhile since you posted...
-
chongman
Topic author - Backmarker
- Posts: 318
- Joined: Thu Dec 28, 2006 11:44 am
- Location: Eastern Shore of Virginia
- Status: Offline
RE: Wip:1/20 Tyrrell P34 (update)
Hey mate! Ran into a couple of clearance fit problems with the rear shocks and coolant pipe mounting on the back of the engine. Got the shocks fixed and almost figured out the pipes. I set it aside and just did some painting of front suspension parts. I'll be posting picture upates this weekend for sure!
When you're racing, it's life, anything that happens before or after is just waiting Steve McQueen 1971