I will build it as open version, without cowling and wheels on, seat and stearing wheel will be seperated too.
Some aftermarket stuff like the Studio27 etch set will find it`s place as well as some Top Studio stuff too, trying to upgrade this kit a little bit.
First of is cleaning parts, as it is an older kit, there are a lot of sinking marks and parting lines to be removed, so lot of sanding, putty and primerjobs needs to be done.
Some scratch build parts will be done and some changes on kit parts are needed to make this kit less toyish.
Fighting with the camera actually, some pics are ok, but lots are not to be used. Have to test a bit what`s going on, so sorry for some bad pictures, still trying to come up with better ones.
Starting with a new cockpit i scratch build from styrene, it takes a few hours to take mesurements and create the new parts and make sure they will fit, so here is a short layout of what i`ve done so far.
 1
1 New parts glued together, but i made a small mistake when checking references again and again, the small part inside glued in an 45° angle has to be removed again, it does not exist in the real car. I added some structure to the back of the cockpit where seatbelts will be fixed later.
 2
2The small part is removed, holes are drilled and the section became a semi gloss black finish as base for CF decals. Dashboard is cleaned from molded switches, they will be replaced later.
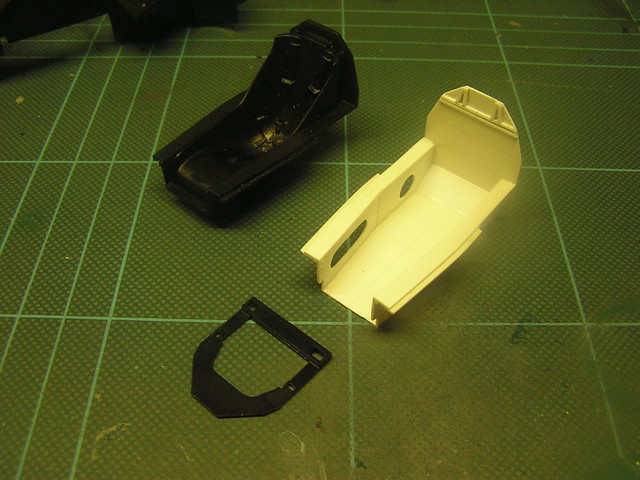
 3
3The seat was seperated from cockpit section, molded in seatbelts are removed and openings for new ones are cutted. Lot of sanding, putty and primertime to get a smooth surface.
 4
4I sanded of the molded rivets and drilled holes in position, some details on top of chassis are drilled out, they will be replaced later with scratch build parts.
 5
5  6
6I removed some fixing points on the inside of the cockpit, scratch build a part where the breakfluid reservoirs will be attached.
 7
7 8
8 Here you can see how old this kit is, heavy shrinking marks on the undertray which needs putty and sanding, kit fixing holes for the cowling are closed as they don`t appear in reality.
 10
10 I glued the sidepods to the cowling and again heavy sanding, putty and a first coat of primer to check the surface, needs some additional touch up.
 11
11 Molded in rivets on the side panels are removed and drilled, first coat of primer applied and sanded. Ready to recieve the edged rivets.
 13
13Now on to suspension parts which needs modifications, i will change the molded dumpers against Top Studio parts, so i had to cut them of. The left side shows the original kit version, on the right a new reated dumper, the lower fixing point needs more modification but first the dumper linkage is opened roughly with a dentist mill.
 14
14  15
15 16
16 Still have to do the same on the front suspension, i don`t like the look of the kit part.
 17
17 So not much real progress instead of cleaning, sanding and more sanding actually. Some parts have their first coat of colour to move on with CF work, but i will clean up everything before i go on with decals.