1973 Yardley McLaren M23 1/20 scale retro-fit

A special Forum for the McLaren M23 series of F1 race cars.
Post Reply

Topic author
pete
F2
F2
Posts: 58
Joined: Wed Jan 13, 2010 8:46 am
Status: Offline

1973 Yardley McLaren M23 1/20 scale retro-fit

Post by pete »

Back in the early mid 1970’s after getting married, I built a few of the Tamiya 1/12 scale F1 cars. The first one I did, and therefore closest to my heart, was the 1974 McLaren M23 car with the Yardley livery. It was a rather simple design, but I always liked the pure white body with the McLaren Orange side panel and three color Yardley “Y” on the nose. Those 1/12 models are long gone now, but I have a few photo slides I took of them on a picnic table one afternoon so they will never be forgotten.

The other day I was looking at the pictures (slides, actually) and the thought occurred to me that since I have a couple of the Tamiya 1/20 scale 1976 McLaren M23 kits on the shelf that it may not be that difficult to retro fit one of them back to a 1973 spec. car. I figured the hardest part would be the decals, since I was not certain they were available. After a quick look at the “Indycal” web site I found the set in 1/20 scale for the Peter Revson number 8 car. The 1/12 scale car I built originally was the 1974 Mike Hailwood number 33 car and it had a rather tall smooth air intake box. The 1/20 scale car here is the number 8 Peter Revson version which had a significantly different shaped air scoop.

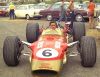
I began doing some book and computer research and found many pictures of the car in its original and restored versions. I placed more “weight” on the original pictures, but because the shots were generally of the car at a distance these only served to get the “look” and decal placement as correct as possible. To figure out the smaller details I had to rely on the close-up detail shots of the restored vehicle, so therefore the model details are based more on the restored car pictures. Just a word of caution here……..I am not what you would call a “rivet counter” by any stretch of the imagination….so I am not looking to have every single wire, hose and rivet on this build. I want the model to look and feel right, but don’t expect every tiny detail to be in place……..my “patience” just will not allow that any more. Further, I get bored working on one build too long so I need to move the process along………and because of that, many details just get lost in the smoke….sorry, but that’s just the way it is.

I have to also state here that many of the modifications were “eyeballed” since I did not have the exact measurements for many components on this car…..actually; the wheelbase (101 inches) was the only real spec. along with track width that I could effectively use.

So, rather than bore you guys with all of the detail modifications I made, just know that every panel and facet of the car was modified, strictly by “Eye-ball” engineering. The air scoop was the most reworked piece on the car (and yes, in hindsight, it looks to be just a tiny, tinny bit too low in the area between the scoop body and the mailbox…..sorry) with about 95% of it scratch built. The oil coolers were remounted in the rear and the radiators were made from sheet styrene with photo-etch HO train walkways over the top. The rear wing was converted from a “Vee” design to a flat smooth front and the support was rebuilt to reflect the angled set up. Rather than spend a gazillion dollars on machined tube couplings, I got some cheap silver “crimp tube” kids’ jewelry pieces and painted them with clear red and blue paint. I had to vacuum-form a new shorter windscreen with the correct slope in the front.

The driver is a Tamiya guy with hand painted scallops in red and blue and a road way “R” in front to basically replicate Peter Revsons’ helmet. I wanted to as closely as possible build the winning car from the 1973 British GP but found no close-up shots to work from.

With all of the talk about the 1/12 scale Tamiya Yardley McLaren out there my timing is just right to have finished this one. Like I said before, I cut some corners with the details, but over all I am happy with the result………it looks and feels right to my eyes.

As a little side note…..the Indycal decals are very thin and delicate to work with, which is great, and you must be very careful. I did not clear coat the number 8 decals on the side pod right away, thinking that they would be ok…….wrong……..after a day I happened to look at the decal number 8’s and saw that they had self-destructed into a hundred little spec’s of black powder……..fortunately, my brother is a graphic sign maker and has the software and vinyl cutter so we rebuilt the number 8 and the two side pod 8’s on this car were cut out of vinyl and applied to the car directly…………..I just thought I would point that out since I was really upset with my stupidity.


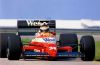
Here is an overview of the car………..

Image

Front view…….
Image

Driver (Revson) with the cowling off………. Image

The engine area………
Image

Driver….reverse side……..
Image

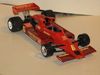
Back side…...what everyone got to see at Silverstone in 1973……..
Image
User avatar

daveyman
FOTA Chairman
FOTA Chairman
Posts: 4550
Joined: Sun Jun 24, 2007 11:39 am
Favorite F1 Team or Driver: Riccardo Patrese
Location: Hull, England.
Status: Offline
Great Britain

Re: 1973 Yardley McLaren M23 1/20 scale retro-fit

Post by daveyman »

Interesting work and a nice result. I've been looking at pictures of the Yardley Mclaren recently and I'd never really noticed the Mclaren orange before. A nice touch. The detail on the engine looks very nice but I would ask if the rear wing is level, looks a bit slanted from the rear view, maybe an optical illusion...
User avatar

Eagle50
FOTA Chairman
FOTA Chairman
Posts: 4038
Joined: Sun Apr 03, 2011 12:05 pm
Location: Tokyo Japan
Status: Offline

Re: 1973 Yardley McLaren M23 1/20 scale retro-fit

Post by Eagle50 »

Beautiful! Nice scratch build on the top air scoop, too! And the piping detail looks believable. (I'm no rivet counter either. Sometimes I just add wires, even if I don't know where they're supposed to go.)

You must be proud of your build. Thanks for sharing!

Chris
User avatar

marlborored
FOTA Chairman
FOTA Chairman
Posts: 2533
Joined: Thu Apr 22, 2004 1:45 pm
Favorite F1 Team or Driver: McLaren, Senna; Lotus, Clark
Location: Honolulu, Hawaii
Status: Offline
United States of America

Re: 1973 Yardley McLaren M23 1/20 scale retro-fit

Post by marlborored »

That is some eye ball you got :!: Great job :!:
User avatar

billgtp
FOTA Chairman
FOTA Chairman
Posts: 2409
Joined: Sat Jan 26, 2002 5:27 pm
Favorite F1 Team or Driver: Chapmans Lotus, James Hunt
Location: Anza ca.
Status: Offline
United States of America

Re: 1973 Yardley McLaren M23 1/20 scale retro-fit

Post by billgtp »

Looks great. Very nice
User avatar

mhbaumer
F1 Test Driver
F1 Test Driver
Posts: 281
Joined: Sat Jul 03, 2010 5:06 pm
Status: Offline

Re: 1973 Yardley McLaren M23 1/20 scale retro-fit

Post by mhbaumer »

Nice convertion!
Congratulations!
User avatar

rtedore
World Champion
World Champion
Posts: 664
Joined: Wed Jun 23, 2010 2:41 am
Location: Columbus, GA
Status: Offline

Re: 1973 Yardley McLaren M23 1/20 scale retro-fit

Post by rtedore »

Nicely done. Great finish on the paint job.
BEST REGARDS
ROY TEDORE


"I BUILD FOR REFLECTION, NOT FOR PERFECTION"

ROY TEDORE 1993

Image
User avatar

vekkuli
FOTA Chairman
FOTA Chairman
Posts: 4446
Joined: Wed Dec 21, 2005 3:20 pm
Favorite F1 Team or Driver: Stake Sauber
Location: Oulu-Uleåborg Finland
Status: Offline
Finland

Re: 1973 Yardley McLaren M23 1/20 scale retro-fit

Post by vekkuli »

Very nice Build & the Driver doesn't look too Plastic either :) . Is that Helmet the original Tamiya 70's?

MGBrown
F1 Test Driver
F1 Test Driver
Posts: 234
Joined: Tue May 29, 2007 9:46 am
Status: Offline

Re: 1973 Yardley McLaren M23 1/20 scale retro-fit

Post by MGBrown »

Very nice- great to see this model that really would have been a no brainer for Tamiya to offer when they re-released the Yardley M23 recently.

I did this exact car "back in the day" but the Canadian GP version with a bit more rounded number (I used letraset rub on numbers) Some of the other details were letraset on plain decal film then coated with clear spray enamel. I didn't have a way to make the drivers name script decal so I freehanded it directly on the airbox with a "sharpie" :shock: I wish I had hands that steady today.

My old build isn't as nice as your new one- maybe I'll revisit it and do some updating? It could probably use some air being in the display case all these years.

BTW I also did Fittipaldi's high airbox Marble-row version with the parts left over... not sure where that model ended up. :(
Post Reply
  • Similar Topics
    Replies
    Views
    Last post