Hello to all.
Well another year has past and the start of another big kit ! I thought I would tackle one of the main problems first which was how to assemble the main body work to eliminate the split line, which is caused by the top and bottom halfs having to be assembled after the cockpit and front suspension has been put in. After much head scratching and many cups of tea, I decided that I would stick the body halfs together and the front suspension bulk head in place, then cut a hole in the floor of the bottom half of the body, just big enough to fit the cock pit into. With that I could assemble the suspension parts in place and the steering assembly, through the hole. Then finish the cockpit, then drop that in place through the hole then put the cut out bit back in place. What could possibly go wrong ?! I have all ready gone and cut the hole, and have done a dry fit of the right suspension parts, its very fiddly but I think it will work ! The rads will fit the body work after it has been glued together and the rear bulkhead fits so no probs there !! That sounds all so easy in theory, we shall see exactly how when I start to do it proper !
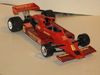
The Tamiya 1/12 Mclaren M23. Here we go !
-
 Whytes
Topic author - Formula e

- Posts: 43
- Joined: Tue Feb 17, 2009 4:46 pm
- Location: Herts,england
- Status: Offline
The Tamiya 1/12 Mclaren M23. Here we go !
- Attachments
-
- Measure Twice.....
-
- .....Cut once
-
- Suspension parts dry fitted through the hole
-
-
- Cockpit dropped through the hole
-
- All fits !
-
 vekkuli
- FOTA Chairman

- Posts: 4438
- Joined: Wed Dec 21, 2005 3:20 pm
- Favorite F1 Team or Driver: Stake Sauber
- Location: Oulu-Uleåborg Finland
- Status: Offline

Re: The Tamiya 1/12 Mclaren M23. Here we go !
Very innovative and nice Start  .
.
My completed Models:
https://www.flickr.com/photos/150229040 ... 3349714787
https://www.flickr.com/photos/150229040 ... 3349714787
-
 lezdep
- FOTA Chairman
- Posts: 3623
- Joined: Tue Aug 23, 2005 2:42 am
- Favorite F1 Team or Driver: Senna
- Location: Toronto
- Status: Offline

Re: The Tamiya 1/12 Mclaren M23. Here we go !
Yes, interesting idea. Will follow with great interest. Good luck !
Sergey's Blog - http://lezdep.blogspot.com/ | Public Gallery - http://picasaweb.google.com/lezdep
-
Alex_Kung
- World Champion

- Posts: 633
- Joined: Tue Jan 15, 2002 10:39 pm
- Your Name: Alex Kung
- Favorite F1 Team or Driver: Gilles Villeneuve
Ferrari - Location: Toronto, Canada
- Contact:
- Status: Offline
Re: The Tamiya 1/12 Mclaren M23. Here we go !
Hmmm very interesting
-
Whytes
Topic author - Formula e
- Posts: 43
- Joined: Tue Feb 17, 2009 4:46 pm
- Location: Herts,england
- Status: Offline
Re: The Tamiya 1/12 Mclaren M23. Here we go !
Hello.
Well ive been tinkering again, must tinker faster. Feels like I haven't done much recently, just cleaning up bits and doing little sub assemblies, so hopefully it will come together a bit quicker. But I keep trying to remake little bits like the rear anti roll bar which I used a piece of aluminium tube and drilled the 5 adjustment holes on either end. I've also been trying to make the aluminium skin for the front bulkhead, which is nearly done just need to put the rivet marks on, there's quite a few to put in. I've also added a bit of weight to the car by bonding in some lead and a couple of pennies in to the engine, to try and give the appearance of weight on the springs and tires. We shall see what difference it makes, if any !!
Well ive been tinkering again, must tinker faster. Feels like I haven't done much recently, just cleaning up bits and doing little sub assemblies, so hopefully it will come together a bit quicker. But I keep trying to remake little bits like the rear anti roll bar which I used a piece of aluminium tube and drilled the 5 adjustment holes on either end. I've also been trying to make the aluminium skin for the front bulkhead, which is nearly done just need to put the rivet marks on, there's quite a few to put in. I've also added a bit of weight to the car by bonding in some lead and a couple of pennies in to the engine, to try and give the appearance of weight on the springs and tires. We shall see what difference it makes, if any !!
- Attachments
-
-
-
-
-
-
-
-
 alexpayne
- FOTA Chairman
- Posts: 3361
- Joined: Mon Apr 14, 2003 4:17 pm
- Location: Oxford. UK
- Status: Offline
Re: The Tamiya 1/12 Mclaren M23. Here we go !
Great start and the re-engineering looks fab.
Atb,AlexP.
Atb,AlexP.
-
 Flemming
- Major Constructor

- Posts: 1195
- Joined: Tue Jul 26, 2005 3:17 am
- Your Name: Flemming
- Favorite F1 Team or Driver: Jackie Stewart - Tyrrell
- Location: Danmark
- Contact:
- Status: Offline

Re: The Tamiya 1/12 Mclaren M23. Here we go !
Hi
Interesting way to get the tub inside the bodywork. But it is indeed possible to get away with that without the saw! By remowing a couple of locating tabs the tub can be pushed in from behind where it will gently click into place between the upper and lower bodypart. Simple and effective.
Best regards
Flemming
-
Jimmy
- F2 Champion

- Posts: 181
- Joined: Wed Jan 02, 2002 8:53 am
- Your Name: Jimmy
- Favorite F1 Team or Driver: AAR, Dan Gurney
- Location: Roanoke, Virginia USA
- Status: Offline

Re: The Tamiya 1/12 Mclaren M23. Here we go !
Flemming,By remowing a couple of locating tabs the tub can be pushed in from behind where it will gently click into place between the upper and lower bodypart. Simple and effective.
Best regards
Flemming
Wasn't there a thread some time ago that dealt with this issue?
-
Whytes
Topic author - Formula e
- Posts: 43
- Joined: Tue Feb 17, 2009 4:46 pm
- Location: Herts,england
- Status: Offline
Re: The Tamiya 1/12 Mclaren M23. Here we go !
Hello.
Another long weekend means more time to tinker ! This week I have been mostly doing some work on the cock pit. I decided to remake the gear lever and linkage. I used some alu tube for the linkage and the gear stick, used some thin sheet alu to connect the stick to the linkage, then I reused the kits gear knob and the bracket which holds it to the side of the cock pit. I then added the throttle cable down by the peddles which was a little alu tube and the sheet alu for the bracket and a piece of black wire for the cable. Then for the first time I used some bare metal foil to cover the inside of the cock pit with, and I must say I am impressed with the way it conformed to the shapes and around the moulded in rivet detail, with tearing or creasing up ! Very impressed , must find more stuff to cover with this !!
Another long weekend means more time to tinker ! This week I have been mostly doing some work on the cock pit. I decided to remake the gear lever and linkage. I used some alu tube for the linkage and the gear stick, used some thin sheet alu to connect the stick to the linkage, then I reused the kits gear knob and the bracket which holds it to the side of the cock pit. I then added the throttle cable down by the peddles which was a little alu tube and the sheet alu for the bracket and a piece of black wire for the cable. Then for the first time I used some bare metal foil to cover the inside of the cock pit with, and I must say I am impressed with the way it conformed to the shapes and around the moulded in rivet detail, with tearing or creasing up ! Very impressed , must find more stuff to cover with this !!
- Attachments
-
-
-
-
-
-