MFH 1/12 Sauber C9

Models in progress... including non-F1 models.
User avatar

Topic author
Hugeprong
F2 Champion
F2 Champion
Posts: 197
Joined: Mon Nov 12, 2012 6:35 pm
Your Name: Hugo Pring
Favorite F1 Team or Driver: McLaren
Location: Cumbria, UK
Contact:
Status: Offline
Great Britain

MFH 1/12 Sauber C9

Post by Hugeprong »

I started the amazing MFH 1/12 Sauber C9 on July 11th and after two weeks, I have done about 80% of the cockpit area.

The actual central monocoque is made up of a series of large white metal components and each had to be glued and clamped in order before adding smaller details, suspension and so on. Obviously alignment is the main issue and lots of test-fitting has to be carried out before committing to Araldite. (The completed model will be really heavy with the assembly weighing 390 grams already.)

I actually spent a good few hours on the pedal assembly which I now realise will be totally invisible! I also built up a representation of the throttle cabling on the right side of the cockpit structure which is more visible but which MFH completely ignores. It isn’t 100% accurate but I think in this scale, it looks persuasive. Wiring on both sides of the cockpit is also a very visible feature of the real car and has been included despite being ignored in the instructions.

So far, the assembly has been satisfyingly straightforward, if time-consuming, and has given me ample opportunity for embellishment - a process I really enjoy. I had fun portraying the fluids in the front master cylinders and a tank which I can only presume carries screenwash! This area will be largely concealed by the front radiator and crash structure later - but I can enjoy looking at it in the meantime.

I have plumbed several wires to the Bosch Motronic Control box (which sits alongside the driver) and even leaving out a relay I built but can't use as there isn’t enough space, the overall impression is now busy enough I think. This area will be covered by a vestigial seat back which is meant to cover the Bosch box. MFH used a similar trick in the Porsche 956 but I dont think these cars actually raced with the passenger seat attached. In any case, I have altered this to attach itself to the floor with a magnet. My hope is that it will be easily removable - if I am able to get the door working later - to show the electronics behind. (Given that there are no seatbelts on this side of the car, and no bucket seat either, you would have to be rather brave to go for a ride at 230mph as a passenger!)

The next step will be to build up the dashboard, side pontoons and rollover structure (page 3 of the instruction booklet) before moving on to start the engine bay on page 4. I am looking forward to the challenge - but not those turbochargers...

I don't know if anyone on F1M has built this kit recently. What's done is done but any warnings or suggestions, hints or tips about what lies ahead of me would naturally be gratefully received.

Thank you for reading this and please feel free to have a look at my gallery website

www.hhms.info

HUGO
Sauber C9 1.jpg
Sauber C9 2.jpg
Sauber C9 5.jpg
Sauber C9 6.jpg
Sauber C9 7.jpg
Sauber C9 8.jpg
Sauber C9 9.jpg
Sauber C9 10.jpg
User avatar

Seema
F1 Test Driver
F1 Test Driver
Posts: 282
Joined: Tue Aug 09, 2016 5:27 am
Your Name: Martin Seelos
Favorite F1 Team or Driver: Lotus, Williams, Toleman, Mclaren.
Location: Innsbruck
Status: Offline
Austria

Re: MFH 1/12 Sauber C9

Post by Seema »

Your start of the C9 looks very good so far. Test fitting is very important with all MFH models, especially when functional doors are a must. Below I have included a link to the official MFH Facebook page. At least two C9s and many others have been set up well described. There are also enough tips and tricks there and otherwise you just ask a question that is answered by some very good builders. Have fun building your Mercedes. I'm looking forward to the next entry.
https://www.facebook.com/groups/1927253 ... ?ref=share
Seema

Sennafan
Constructors Champion
Posts: 1308
Joined: Sun Mar 07, 2010 12:59 pm
Favorite F1 Team or Driver: Ferrari

Mansell
Location: Houston
Status: Offline
United States of America

Re: MFH 1/12 Sauber C9

Post by Sennafan »

It’s actually one of the better fitting full detail kits with all body panels fitting with little modification

viperdoug
F2
F2
Posts: 57
Joined: Fri Apr 01, 2011 5:35 pm
Favorite F1 Team or Driver: SENNA
Status: Offline
United States of America

Re: MFH 1/12 Sauber C9

Post by viperdoug »

A couple areas to watch out for, I had a little problem with the fuel fillers and rear brake ducts lining up with the body openings. The fuel fillers were just fixed by a little filing and taping on the body while the glue (I used epoxy) was curing. The brake ducts took a lot of work to get them to sit correctly, for me the right side was off by 1-2mm, it took time but it can be done. Overall its a pretty nice kit.
User avatar

gp-models
FOTA Chairman
FOTA Chairman
Posts: 3464
Joined: Sun Oct 07, 2012 2:17 pm
Status: Offline

Re: MFH 1/12 Sauber C9

Post by gp-models »

As it is a C9 i`m definately in for this build, nice start so far. :)
Take a stand!

primabaleron
F2 Champion
F2 Champion
Posts: 96
Joined: Mon Nov 04, 2019 1:16 am
Your Name: Tomasz
Favorite F1 Team or Driver: Fangio
Location: Poland
Contact:
Status: Offline
Poland

Re: MFH 1/12 Sauber C9

Post by primabaleron »

My best MFH. Enjoy building!

Image20220710_135330 by Tomasz, on Flickr
Image20220710_135940 by Tomasz, on Flickr
Image20220710_140227 by Tomasz, on Flickr
User avatar

jorgeralvear
Best of the Rest
Best of the Rest
Posts: 547
Joined: Tue May 06, 2008 10:07 pm
Your Name: Jorge Alvear
Favorite F1 Team or Driver: Kimi/Ferrari
Location: Duluth Georgia USA
Status: Offline
Chile

Re: MFH 1/12 Sauber C9

Post by jorgeralvear »

Looks like the real car. Fantastic work! 👏🏼👏🏼👏🏼
User avatar

Topic author
Hugeprong
F2 Champion
F2 Champion
Posts: 197
Joined: Mon Nov 12, 2012 6:35 pm
Your Name: Hugo Pring
Favorite F1 Team or Driver: McLaren
Location: Cumbria, UK
Contact:
Status: Offline
Great Britain

Re: MFH 1/12 Sauber C9

Post by Hugeprong »

Thank you Tomasz. I am aiming to finish this within 3 months and so I am not sure mine will be nearly as good as yours

I have now finished the main monocoque after adding lots of details between the seats as well as behind the dummy passenger seat (which is held in place by a magnet). Test fitting the bodywork shows it fits very snugly and so I chose not to add simulated duct-tape to the roll cage which would make it slightly thicker. (It will hardly be visible later anyway.) At this stage, the rads and fuel intakes line up with the bodywork nicely but I find with MFH, you never know for sure until the body is fixed permanently!

I am now starting the engine with all those connectors and that highly visible wiring around the camcovers and beneath the plenum chamber. It looks devilish, and then there are the turbo assemblies to look forward to, surrounded by PE boxes. I am determined to try and get the engine/gearbox lined up exactly if I can - well in advance. The massive rear wing is supported by two PE panels and without a perfectly aligned rear assembly, I dont suppose one has much chance of a straight and level rear wing! At the same time, I am told that the rear brake cooling ducts are very hard to align with the holes in the rear bodywork. Again, I am hoping that the more exactly the gearbox is aligned, the better the chance of getting them to fit.

One thing that rather lets MFH kits down in my opinion are the moulded sprues of tiny, rather brittle, rubber boots MFH provide for the connectors. They are very hard to drill through to allow wires into them - and very hard to secure to the rest of the connector once you have done so. I will do my best with them this time as well as with some cast metal connectors under the plenum that are too small to drill into! I just hope it ends up looking decent.

I didn’t even bother trying to use the hose ties/universal clips provided as PE parts. I have never got them to work properly as they are so stiff and look awful when attached to the hoses. (I have also twice cut myself deeply using them!). Has anyone got any tips on getting them to fit really tightly around the hoses and secure them there? There must be a simple way to get them to work as shown in the instructions but it seems to be one of those things that looks easy but is actually really hard!! I also must say that I don’t enjoy using the shrink hose provided by MFH. It never seems to shrink enough or look thick enough. This time it looks OK-ish but several times I was worried I would actually melt the white metal beneath. (Does anyone have any reliable tips on how to use this stuff on white metal reliably?)

Image
Attachments
Firewall with Motronic detailing
Dashboard
Dashboard
Flocked Steering Wheel looks better in real life than in this photo!
Rear of fire wall.
Rear of fire wall.
Cockpit
Cockpit
Front with hydraulic/washer fluid reservoirs
Cockpit with dummy seat removed
User avatar

Topic author
Hugeprong
F2 Champion
F2 Champion
Posts: 197
Joined: Mon Nov 12, 2012 6:35 pm
Your Name: Hugo Pring
Favorite F1 Team or Driver: McLaren
Location: Cumbria, UK
Contact:
Status: Offline
Great Britain

Re: MFH 1/12 Sauber C9

Post by Hugeprong »

68.JPG
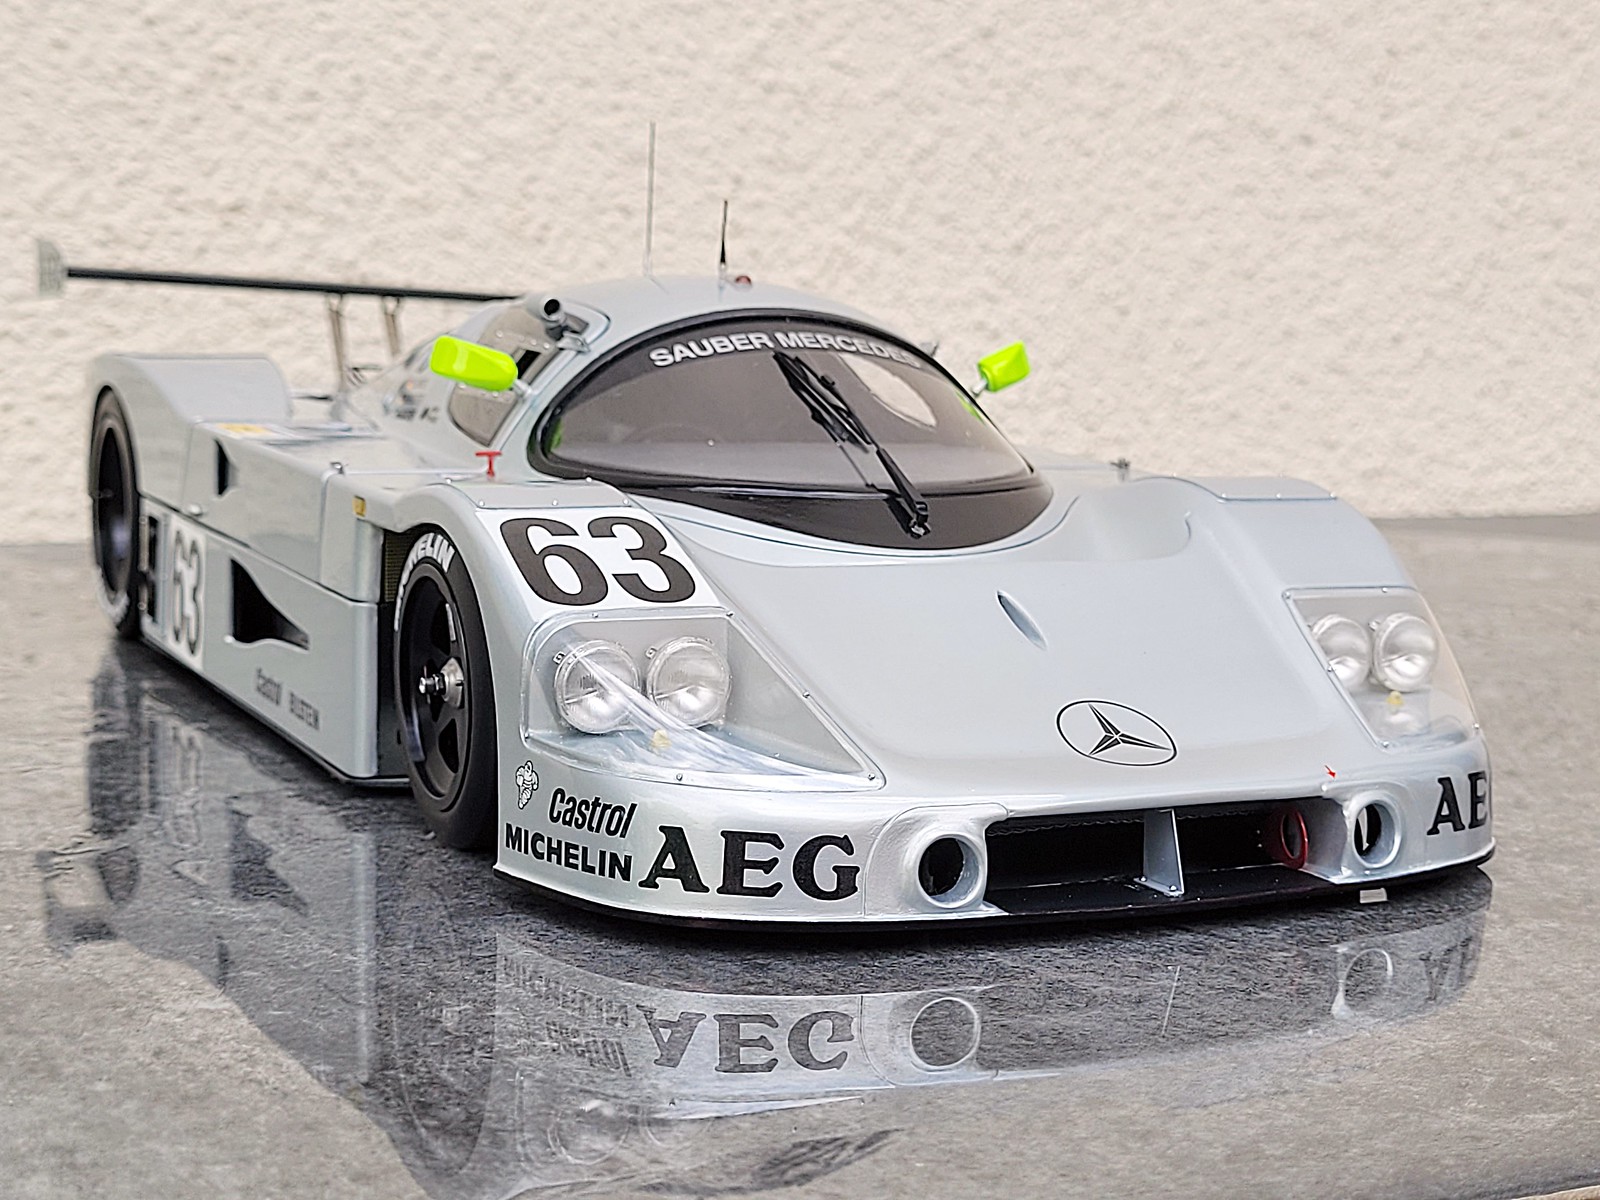
Over the last month, (inspired by Primabaleron’s amazing work), I have completed the entire rear end of the C9 (with the sole exception of the rear wing supports which I will add at the last moment as they look very flimsy)!

The engine was relatively straightforward. I was concerned that the joint between engine and firewall was so fragile (2 small screws to the back of the cockpit) and so I was careful to ensure that the plenum chamber connected decisively to the intercooler pipes to give the top of the engine some real strength. I kept the floor of the car attached to the cockpit section to keep the overall assembly as strong as possible whilst I worked on all the wires and pipes around the engine – a process that lasted many days. The floor also acted as a very good reference plain to enable me to set the exhausts to the correct height for the turbo assemblies on each side which are attached much later. (I mention this just because the instructions indicate that you should work on this section without the floor being attached.)

The Ocean Grey frame that carries the rear shock absorbers is the key to the strength and the alignment of the whole rear of the car. You can only attach these by detaching the floor and manoeuvring them around the exhausts before clamping them to the rollover frame. As they dry, you can attach the polished metal crossframe (and anti-roll bar) using two micro-screws that are inserted under the shock absorbers which also ensures they are exactly in line as the epoxy glue dries. You can then re-attach the floor.

Moving onto the gearbox assembly, I chose not to fix the oil radiator and the prominent rear bodywork support frame until I could be sure that the frame would exactly fit the receiving holes on either side of the rear floor. I found that the various PE parts fitted well enough and it was just a case of ensuring that all the holes were properly opened up for the suspension and oil pipes. I found I was able to attach the gearbox precisely over the single screw hole in the floor that ensures it is perfectly aligned when mated to the engine and I then built up and attached the suspension on either side (leaving out the rear lower wishbones). I struggled with the rearmost gear linkage shaft which I needed to extend by about 2mm to fit snugly at front and back.

After completing the whole gearbox and rear suspension, I carefully removed the floor for the last time to paint it and build up the various PE parts that fit into it behind and below the exhausts. Then came the moment of truth when I presented the entire cockpit, engine, gearbox and suspension/uprights to the floor and committed to using glue! The tolerance around the exhausts and the PE shields that box in the exhausts was almost non-existent and I needed to use a small screwdriver to prod and push the PE parts so they fitted perfectly on either side of the car. I was really relieved that nothing broke at this stage and as the whole assembly dried, I attached the rear oil radiator and the metal bodywork support frame which fitted (with a tiny bit of persuasion!) into the floor on either side.

There was one hiccup after this stage – namely the lower rear wishbones. You are required to enlarge the holes in the floor through which these pass on either side but even having done this, I found there was no way to wiggle them to sit precisely below onto the uprights and at the same time get the locating pins on each arm to fit into the pre-drilled holes on either side of the gearbox. In the end, I had to bend both of them inwards significantly to get them to fit through the holes and then re-bend them outwards before attaching the inboard ends. You cannot actually force them into their location holes – or at least I could find a way to do so. I think a better option would have been to cut away the rear central section of the floor itself to expose the whole gearbox underside - and then re-attach the floor once the wishbones had been attached.

Finally in this section was the dreaded turbo assembles which I always hate. The 3d printed exhausts are lovely and light and fitted easily. However the turbos themselves were difficult to position perfectly as there is very little room in which to work due to the vertical PE plates attached to the floor behind each one. I actually drilled a hole through the turbos and inserted a horizontal metal rod which allowed a much more positive join with the air inlets and turbo exhausts. I think I will always do this in future! The upper PE plates exactly fitted around each wastegate mounting point and I weathered these with Alclad colours before attaching the wastegates themselves. I overdid the smoke on the yellow Kevlar intakes on each side in front of the turbos and so I added an extra layer of decals here. When the bodywork is attached, you will not be able to see the front of these intakes and so I did not waste further time on them.

I hope these photos are of interest to anyone else who attempts this project. If you do so, please consider using the floor as a base to the model throughout and attaching the cross frame to the back of the engine to close up the reinforcing frame rather than attaching it to the gearbox and attempting to attach it to the engine later. I would also suggest cutting out the rearmost centre section of the floor to allow easier fitment of the lower wishbones and then adding it back afterwards. I think these were probably my most useful “learnings”!

I reckon I am now about 2/3rds of the way through the project and so I am hoping to complete the model by early November. However a two week holiday to Turkey might get in the way of this aspiration. However it will be nice to have a break before contemplating those doors...

Best regards

Hugo

PS I am sorry that the photos are in reverse order. I couldnt work out how to turn them around!!
Attachments
66.JPG
65.JPG
62.JPG
39.JPG
37.JPG
30.JPG
26.JPG
24.JPG
23.JPG
User avatar

gp-models
FOTA Chairman
FOTA Chairman
Posts: 3464
Joined: Sun Oct 07, 2012 2:17 pm
Status: Offline

Re: MFH 1/12 Sauber C9

Post by gp-models »

Very impressing, nice work! :)
Take a stand!
Post Reply