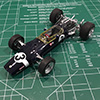
Just getting started

Working on the DFV

I decided to leave most of the chrome parts as is even though I'm not 100% happy with how the chrome looks. BUT, I couldn't let the velocity stacks go so I stripped them and painted them with some Model Masters Metalizer and then polished them.

I don't have an airbrush and don't really want to have the hassle of one either so I don't think I have access to the fancier metalizer paints. But the Model Masters seems pretty decent.

I decided to add some brake lines using some thin wire I found at Hobby Lobby painted silver.

I also added fuel lines to the DFV using some clear plastic tubing (0.4mm I think) painted yellow. I'm not that happy with the color the fuel lines came out (I think it's too light and yellow) but after about 4 different tries (too dark, too light, too orange, etc.) I finally decided to just leave it.

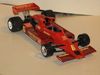
Wheels are on! The nose doesn't fit at all.


On a side-note, does anyone know where to find the aftermarket metal velocity stacks? I have a Tyrrell 002 waiting to be started and it might be nice to have some of those cool metal ones but I can't find them anywhere. Is it just me or do those aftermarket parts for certain kits disappear really quickly?