

A look at the inside of the box, all the parts still in the plastic bags....

Everything spread out. I did open the tire blister pack back in the day and started taking the mold seam off the middle of two tires, but that's all I did. Then I dragged this box along in life like Steve Martin in The Jerk did with his toilet seat....

Everything is out of the bags... no turning back now.

Engine eye candy...

These pieces out of the box look pretty good.

Lots of silver grey parts with radiators, brakes, rotors, shocks and stuff:

Black parts...

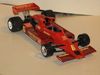
Test fit the carbon / aluminum monocoque with the undertray, basically an upside down airplane wing. Wish we still had cars like this....I guess they figured they are too dangerous?

Body parts made it 34 years without much warp. Fit is another story...

1982 chrome plating stinks for Tamiya standards. Lots of missed spots and dust painted in. I'll be re-doing all of it with 2016 painting technology.

The monocoque is a two piece nicely cast and comes in the box like this

The two tires I sanded probably in 1983 or so....Reagan era.

Thank the lord for people like Indycals who allow us to resurrect old kits with new decals....here is my new set vs old

I ordered this PE set from Germany.

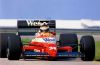
OK, lets get down to business. My modeling style is to research the car as much as I can to get familiar with finishes, decal placement, patina, colors. I am neither inspired or motivated to build out of the box without big photos to keep me on track and interested. I like real replicas of actual cars. I also like to mock up my subject as much as I can without final paint or glue so I can understand how it all goes together and plan for finishes and details before I get into problems. It also keeps me interested to see where I'm going. I think the build goes faster and comes out better this way for me. I'm a broad stroke kind of guy before I loose my eyesight on paint and details. One thing is for sure.... the Renault was a huge car!

The body parts actually fit together pretty well with a little clean up.

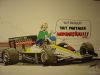
The gorgeously designed rear wing of the Renault was not done any justice by the fit of the parts. Lots of putty and sanding coming.....oh, joy.

More nasty seams....oh well, that's why we are so good at what we do, we suck it up, fill and sand!

Things fit pretty well inside the body panels.

Biggest fit problem was back here, but some hand held laundry steaming and sanding will fix it.

How it should be, you can see why sanding this wheel well needs to be done.

Another view of the other wheel well. All in all pretty good engineering in these panels by Tamiya.

The first pieces I started sanding, filling and gluing per instructions is the steering gear box. Lots of ejector marks to fill.

It's "puttytime", queue the MC Hammer music....

Trust me, this will be a beautiful piece when sanded, primed and painted, hopefully this year.

That's it for the first night. Spent about 2-3 hours so far. Wish me luck!