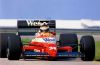
The Kit is a 1973 M23 as driven by E.fittipaldi after some research and looking at the different M23's i decided i wanted to go for a different livery and chose the Yardley Livery. the build itself will be fairly oob with the obvious change of livery and some braided lines to liven up the Engine bay. of course i might get carried away as i have found most people do so this may change during the build. anyway progress to this date.
First part i managed to start, still not finished need to add the tops to the reservoirs will add them once they're painted will add the front subframe and battery once this part is glued into the chassis

Chassis complete with the drivers cockpit and front suspension to test fit, also added the radiators and rear firewall at this time. Orange is Tamiya TS-56 which i believe is to be a close match to the Mclaren orange


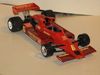
Rest of bodypanels need cleaning up prior to primer and paint, i am also going to try to modify the opening on the airbox to that of a 1973 Yardley

The Yardley decals from Indycals, excellent turnaround from these guys and superquick delivery considering they had to cross the pond

Front discs just need to touch up the calipers with some flat black

Start of the engine assembly, cant help but thinking it looks a bit plain. Would it look better with a wash never done one before?


Exhaust manifolds from the reference pictures i have been using the manifold was held together with exhaust springs so i've started to add these. also manual calls for a matt black colour but the reference pictures look like a dirty stainless. so i'm thinking alclad stainless and again attempting a go at a wash to make them look used, any tips?