WIP: 1/20 Tamiya Ferrari F60

Re: WIP: 1/20 Tamiya Ferrari F60
Can you get TS-85 in the UK?
-
 d111298pw
- Constructors Champion

- Posts: 1347
- Joined: Thu Dec 11, 2008 9:15 am
- Your Name: Mark Nicodemus
- Favorite F1 Team or Driver: Ferrari
- Location: Oklahoma
- Status: Offline

Re: WIP: 1/20 Tamiya Ferrari F60
Unfortunately, you can't buy any Tamiya TS paints in the UK. There is no time frame on when, or if, they will be available again.
Mark
Re: WIP: 1/20 Tamiya Ferrari F60
i managed to get some of Ebay, from a guy in hong kong. I payed more for it than you would have in a shop, but it arrived pretty quickly. Well, quickly for the royal mail... 
Be GENETCIALLY DIFFERENT, baby!
Follow me on twitter- @Nick47CRG
Follow me on twitter- @Nick47CRG
-
 Mr.Grumpy
- FOTA Vice Chairman

- Posts: 1901
- Joined: Sun Apr 18, 2004 3:38 am
- Favorite F1 Team or Driver: Jacques Villeneuve
- Location: Toronto, Canada
- Status: Offline

Re: WIP: 1/20 Tamiya Ferrari F60
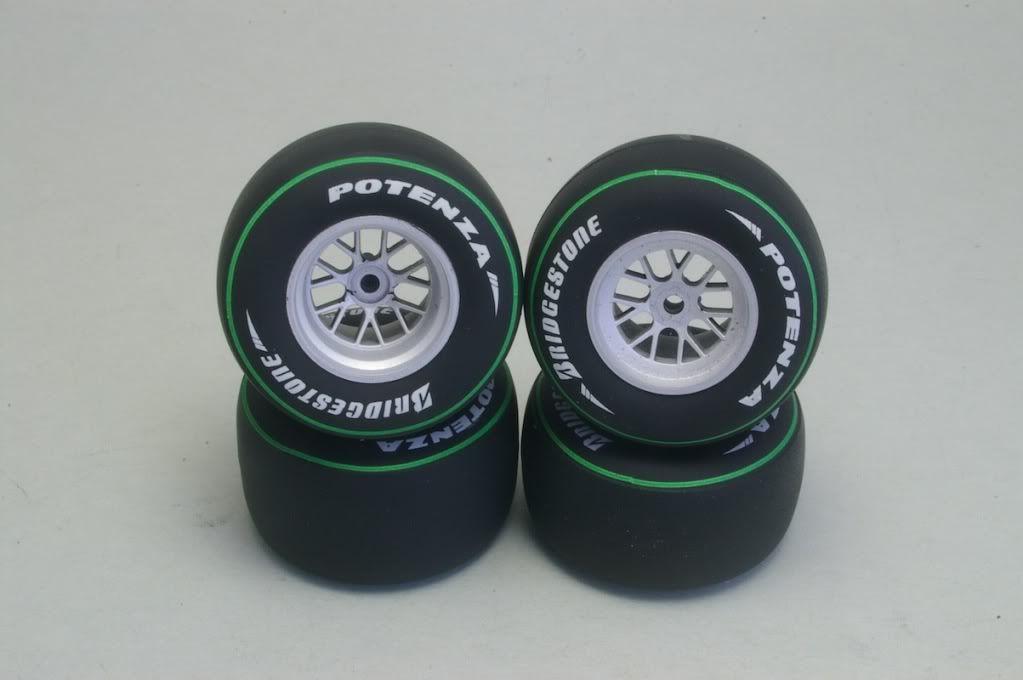
what's with the gap on the green stripe tire decals? is that supposed to be there?
-
 De21
De21
Topic author - Major Constructor

- Posts: 1096
- Joined: Thu Jun 03, 2004 9:53 am
- Favorite F1 Team or Driver: Williams
- Location: Germany
- Status: Offline

Re: WIP: 1/20 Tamiya Ferrari F60
That is what I don't get too. I can only think of two reasons. Either that they fit to all 2009 kits from S27, E-Jan and Tamiya since all tyres are a bit different or simply to save space on the decal sheet...Mr.Grumpy wrote:what's with the gap on the green stripe tire decals? is that supposed to be there?
-
 BigDuke6
- Major Constructor
- Posts: 1185
- Joined: Sun Feb 10, 2008 10:15 pm
- Location: Sydney, Aus
- Status: Offline
Re: WIP: 1/20 Tamiya Ferrari F60
i had to cut some green off my decals to make them fit the tamiya wheels: (5mm)

Re: WIP: 1/20 Tamiya Ferrari F60
I'd primarily go with "saving space on the decal sheet". It's better to use than half circles i'd say but still gives you the possibilty to fit them to various tyres. On the other hand, cutting a full circle decal yourself to achieve that isn't exactly witchcraft :-)Decs0105 wrote:That is what I don't get too. I can only think of two reasons. Either that they fit to all 2009 kits from S27, E-Jan and Tamiya since all tyres are a bit different or simply to save space on the decal sheet...Mr.Grumpy wrote:what's with the gap on the green stripe tire decals? is that supposed to be there?
-
De21
Topic author - Major Constructor
- Posts: 1096
- Joined: Thu Jun 03, 2004 9:53 am
- Favorite F1 Team or Driver: Williams
- Location: Germany
- Status: Offline
Re: WIP: 1/20 Tamiya Ferrari F60
or painting them by hand http://blog.kawaharamodel.com/?page=1jaykay wrote:On the other hand, cutting a full circle decal yourself to achieve that isn't exactly witchcraft
Re: WIP: 1/20 Tamiya Ferrari F60
nah....still rather go with the decals 
Maybe if you mount the tires to the lathe....
Maybe if you mount the tires to the lathe....
-
De21
Topic author - Major Constructor
- Posts: 1096
- Joined: Thu Jun 03, 2004 9:53 am
- Favorite F1 Team or Driver: Williams
- Location: Germany
- Status: Offline
Re: WIP: 1/20 Tamiya Ferrari F60
next update!
I am still busy with sanding, drilling and preparing all the parts for painting but I am getting there. I sprayed the last layer of grey primer yesterday (hopefully).
I decided to remove the gearbox from the engine, simply to have it a bit easier with painting and CF decals.
Once I did that (advise to anyone who wants to do it too, do it before glueing the parts together, that will be a lot easier ) I glued a piece of styrene to the engine, so I can just "slide" the gearbox in place. Furthermore I added some proper "pins" to the exhaust which makes testfitting a lot easier .

Next step was to glue the LED backlight in place. It is a clear plastic part so I painted the inside silver first and I will later remove the paint with some careful sanding. To my surprise the clear part didn't fit perfect in fact the shape was different and a bit smaller compared to rest of the rear crash structure. Anyway I just used a bit more glue so I could use the excess as filler.

An then I rescribed the "seam" with a 0.15mm chisel.

drilling out and sanding the exhaust tip as described in the last update worked quite good...


Another little flaw on the kit is this part, which is right in front of the engine. I actually don't know what it is maybe some kind of pump (if anyone know, please let me know :wink). The thing is it is not "solid" and you can still see that when the part is in place... So again more putty needed and while I was at it I also filled some more pin marks on the back of the steering wheel. (I also found 2 more on the undertray
  )
)


Back to the body parts. The panel lines around the exhaust outlet are really "light". At first I thought it would be ok but after seeing them with primer I decided to rescribe them too. You almost can't see them on the pic on the left, right side already taped as a guideline.

And a pic after rescribing and some sanding. I also removed the moulded washers or infact enlarged them to later add some PE bolt heads. The "holes" for the bolts are 0,7mm and 0,9mm for the washers around the exhaust exit. I'll use some of the tiny Model Car Garage PE parts.

The "holes" look huge here but as you can see with the washer and bolt in place it looks ok and there is still some paint missing. Incase you can't find the PE parts, both are pretty much right in the middle of the pic

Just two random pics, I love the look of an F1 kit in primer
(notice the little exhaust tips in these huge outlet "holes", looks hideous. The late season car looks so much better  )
)


I am still busy with sanding, drilling and preparing all the parts for painting but I am getting there. I sprayed the last layer of grey primer yesterday (hopefully).
I decided to remove the gearbox from the engine, simply to have it a bit easier with painting and CF decals.
Once I did that (advise to anyone who wants to do it too, do it before glueing the parts together, that will be a lot easier
Next step was to glue the LED backlight in place. It is a clear plastic part so I painted the inside silver first and I will later remove the paint with some careful sanding. To my surprise the clear part didn't fit perfect in fact the shape was different and a bit smaller compared to rest of the rear crash structure. Anyway I just used a bit more glue so I could use the excess as filler.
An then I rescribed the "seam" with a 0.15mm chisel.
drilling out and sanding the exhaust tip as described in the last update worked quite good...
Another little flaw on the kit is this part, which is right in front of the engine. I actually don't know what it is maybe some kind of pump (if anyone know, please let me know :wink). The thing is it is not "solid" and you can still see that when the part is in place...
Back to the body parts. The panel lines around the exhaust outlet are really "light". At first I thought it would be ok but after seeing them with primer I decided to rescribe them too. You almost can't see them on the pic on the left, right side already taped as a guideline.
And a pic after rescribing and some sanding. I also removed the moulded washers or infact enlarged them to later add some PE bolt heads. The "holes" for the bolts are 0,7mm and 0,9mm for the washers around the exhaust exit. I'll use some of the tiny Model Car Garage PE parts.
The "holes" look huge here but as you can see with the washer and bolt in place it looks ok and there is still some paint missing
Just two random pics, I love the look of an F1 kit in primer
(notice the little exhaust tips in these huge outlet "holes", looks hideous
Last edited by De21 on Mon Feb 22, 2010 6:34 pm, edited 1 time in total.