Page 1 of 11
GB 2009 : WIP Brabham BT46 - Complete!!!
Posted: Sat Mar 28, 2009 11:49 am
by CBartholomew4677
Hello All,
As I noted in the original GB posting, my GB 2009 project will be the Tamiya Brabham BT46 in 1/20 scale.
I've had this kit for quite a while always planning to build it, and you all have given me the opportunity and impetus to do it.....finally.
I'm planning to add some details, at minimum wiring, plumbing and fittings, seat-belts, etc.
No plan to go over-board. I haven't built a kit with an engine for a while, so this will be fun again.
Original decals are basically ruined, but I bought a second set when I originally got the kit, so maybe I'm OK. If need be, I'll pick up a set of the S27 decals, but I like the color combo of the base kit better.
I'm expecting to be slow, as I get going and finish out the Ferarri F2004.
At any rate, off we go, I can't wait!!
Cheers,
Chris
Re: Group Build 2009 : WIP Brabham BT46
Posted: Sun Mar 29, 2009 1:10 am
by CaptainMark
Nice one, keep us posted Chris.
Re: Group Build 2009 : WIP Brabham BT46
Posted: Sat Apr 11, 2009 10:47 am
by CBartholomew4677
Hello All,
Despite the on-going work on the Ferrari F2004, I did get started a little bit on the Brabham BT46 for the G.B. 2009. Since I haven't built an engine into a car in quite a while so I wanna put some detail into that area.
First up is bolts: I cut away the original molded-in "bolts" (i.e.; little blobs of plastic) and drilled the holes for the new. I plan to use Scale Hardware bolts and rivets. You can see what I've done. More to be shown as available.
Cheers,
Chris
Re: Group Build 2009 : WIP Brabham BT46
Posted: Wed Apr 22, 2009 8:44 pm
by CBartholomew4677
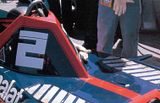
OK, I've finally begun in earnest to work on the Brabham BT46, mainly opening things up, drilling holes, cleaning things up, etc. I have a couple questions and request for you all.
1. Does anyone have any engine and/or cockpit pics of this car? I am struggling to find them in my resources. If you have them, can anyone e-mail them to me? I would really appreciate the help.
2. Should the vents on the rear deck be opened and meshed, see the pic below for what I'm talking about? I don't have any pics of this either. Anyone has a pic, it would help me out.
I appreciate all of your help.
Cheers,
Chris
Re: Group Build 2009 : WIP Brabham BT46
Posted: Wed Apr 22, 2009 9:31 pm
by BigDuke6
Re: Group Build 2009 : WIP Brabham BT46
Posted: Wed Apr 22, 2009 10:43 pm
by CBartholomew4677
Thanks much, this helps a lot!! Looks to me then, that they are fine honeycomb mesh, kind of what I thought.
Cheers,
Chris
Re: Group Build 2009 : WIP Brabham BT46
Posted: Fri Apr 24, 2009 4:52 am
by Chinamalc
Chris,
Here is the real thing.
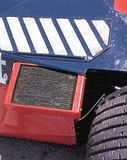
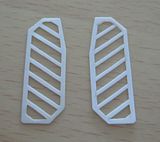
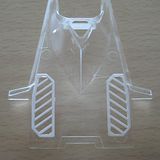
This is what I did, I cut holes in the rear deck 1mm inside the panel line to leave a support for the new filter surrounds. I made the new filter surrounds (white bits) from 10thou plastic card, I used tracing paper to transfer the pattern from model to plastic card. White blotting paper is what I used for the filter and looks pretty close to the real thing on a 1/20 model.
Malc.
Re: Group Build 2009 : WIP Brabham BT46
Posted: Sat Apr 25, 2009 9:05 pm
by CBartholomew4677
Malc,
Thanks for the pictures, this is great. I've cut out and cleaned up the portions inside the vents, now considering to cut the whole thing out, along the same lines you had done. Have you seen the actual car? What is the filter made from? Looks somewhat "fuzzy", like it's made from cotton, but I would think that would have a risk of sucking the filter into the engine. For my own curiosity.
Do you have any more pictures of the car, particularly engine pictures?
A little progress made recently, notably I'm unhappy with the kit fuel injectors, so I decided to make new ones. Here is my current status, with new injectors made from aluminum tube and steel wire. Drilled a small (0.4mm) hole in the side of the tube and the end, then glued a steel wire into the side. Clear line will be inserted into the end of the aluminum tube. Picture of original kit and my new (preliminary assembly only right now) below.
Does anyone know where the fuel pump on this engine is? The fuel lines going into the injectors have to start somewhere, eh?
I appreciate any help. Comments and feedbacl always appreciated.
Cheers,
Chris
Re: Group Build 2009 : WIP Brabham BT46
Posted: Mon Apr 27, 2009 10:18 am
by Chinamalc
Hi Chris,
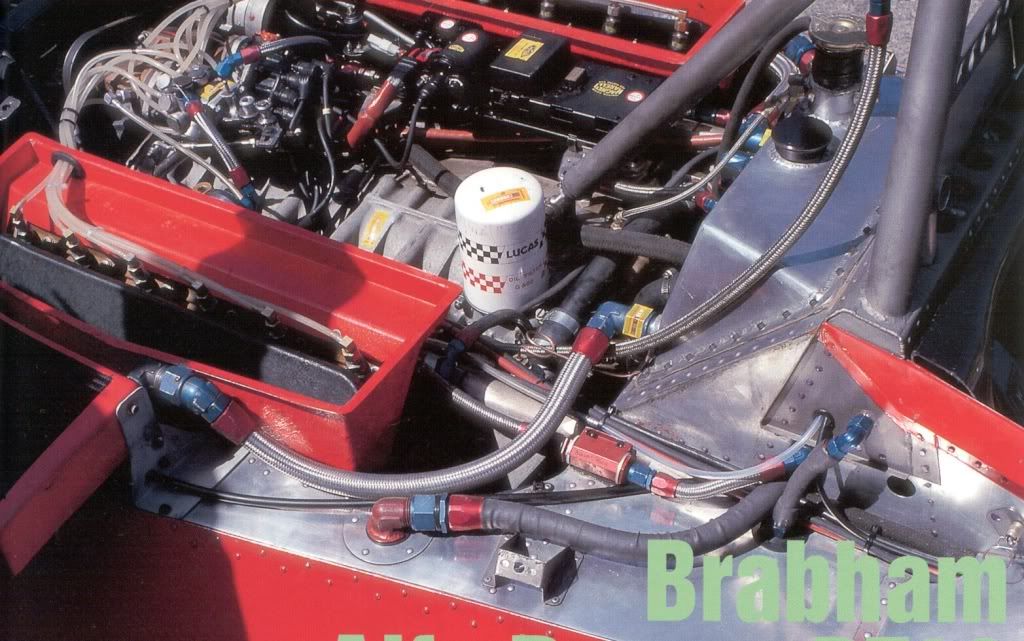
As I say, I think white blotting paper would be the best representation of the filters on a scale model. The real car probably had some kind of wire mesh on the underside to prevent the filter material being sucked in to the engine!!
Here is a pic of the engine. You can see the high pressure fuel injection pump next to the distributor, the low pressure pump is inside the body somewhere. The question is how far do you want to go?? The 'blobs' moulded in to the throttle slide bear no prepresentation of the real thing, the injectors are on the side of the intake trumpets and always were (sse photo), so I have no idea why Tamiya moulded them on the slides. The biggest challenge for you is to make the airbox surround for the intake trumpets... I still have not done this on my model!....
I bought some of the excellent Widia fuel injectors as sold by MacsModels (for DFV engines but they are close enough for me!!):-
http://www.macsmodeling.com/index.htm - 1/20 scale - detail parts.
Regards,
Malc.
Re: Group Build 2009 : WIP Brabham BT46
Posted: Mon Apr 27, 2009 12:26 pm
by Icon_Modeler
Hi Chris I tried to upload some pictures for you but the file is too large. What is your email address??
Icon Modeler


