
The plan is to go 'enhanced box stock' - I'll be trying my novice hand at some scratch build improvements to existing parts, without really building anything new.
Here's the box shot:

And here we have the first issue - despite the box description, this is definitely not an LP500S. Note the shape of the front wheel flares, and the way it blends (or more precisely, doesn't blend) into the front air dam. From the LP400S models on, the flare was a rounded square instead of a smooth arc - and it was blended into the air dam smoothly. The wheel style, too, disappeared during the LP400S run, to be replaced by the smoother dished ones. Also, some of the engine details point towards the kit's true roots as an LP400. At best, this is modeled after the Walter Wolf LP400S prototype. I'm not going to quibble over the details, I'm going to build this as is and say it was built at the same time as the Wolf prototype
Second issue is the horrid gold chrome in the kit - very splotchy and uneven.

This will be stripped, and anything meant to remain gold (mainly the wheels) will be resprayed with Alclad pale gold.
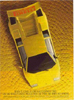
Finally, just because I can't stand not seeing it, here's the dry fit of the body. Lots of finessing will be needed to make this sit right in the end . . .

Then the goodies arrived! Acu-Stion, so they were pricey, but lots of options. Biggest disappointment is that the scripted logos (5th row) are 4 mm too wide to use on the valve covers - but most of my reference material shows they were painted anyway, so I'll leave the kit ones.

The hood logo is smaller than the kit pieces, too - looks more accurate to me. Other advantage is the chrome on the kit pieces is way too thick, so there's no detail - even stripped, the detail isn't great. These should look nicer if my painting hand does them justice. Same for the wheel inserts - the top row fits them perfectly, and the same size works for the steering wheel as well, which the kit doesn't supply anyway.

And the logos for the rear - kind of an odd trade-off here - the PE Lamborghini has a capital L instead of lower case as on the 1:1 and kit, but the "t" in Countach looks better on the PE.

Made the scripts gold, since the car will be black - the emblems are gold too, but still need the black added, and the clear:

Modded the rear mesh screen between the exhausts - the kit part has a 'solid' mesh:

Cut that out and replaced with an aluminum mesh for sculpting:

Got a start on the interior as well - it's molded with a texture everywhere it is supposed to be leather, but looks more like carpet. I'll have to sand this away - but the speaker grills will get lost in that process.

So, I'm drilling them out - taking a while, and I've already busted a couple of #78 bits . . .

Finished the cleanup of the interior - did the seats too, they had the same texture issue. Drilling the speakers took longer than I thought - final cost was 6 - 8 #80 drill bits broken, and one bit through my finger tip (from closing the bit container, if you can believe that). Worth the bits, not sure about the finger . . . .

Finished up the emblems - very thin black enamel paint applied in the open areas, and it wicked right into all the little gaps. Took a bunch of applications, but came out pretty good. Finished with some Future. I couldn't get good pics of the wheel caps, but here's the hood emblem.

I also started modding the instrument panel - again, the main surface was molded with texture, when it should be aluminum.

Couldn't possibly sand that out, so I decided to remove it and build a replacement.
The completed wheels, added some valve stems from RB Motion . . .

The engine, with a light black wash:


Carbs were done in Alclad duraluminum, given a light wash of Tamiya acrylic titanium gold, and some detail work in the full strength color as well.

Same wash applied to the throttle linkages.

Suede dash is Valspar suede spraypaint, overcoated with flat black acrylic. This needs another coat of black, some gaps in the coverage.

And got the flocking in . . . again, some spots neat retouched and cleaned up - but overall, not too bad for my first attempt.


The finished dash rebuild - honestly, it could have been a bit better, but given how visible it will be, it's plenty good enough. Panel is a sheet of styrene, drilled out and painted with Alclad aluminum, bezels are cut from styrene tubes with a miter box and painted semi-gloss black. The gauge faces were printed on photo paper and attached to another sheet of styrene with double sided tape, then glued to the back of the panel and installed.

With that out of the way, I was able to get a lot done on the interior - have a few trim pieces around the back window left, and then I'll add some belts and possibly some rubber mats for the driver's footwell. Seats aren't glued in yet either . . .

Another view - the steering wheel rim is done in my new favorite black leather look - Tamiya rubber black (TS-82) cleared with semi-gloss clear (TS-79). It gives a good tone without being solid jet black. The telescoping neck of the wheel is straight TS-82 (more visible in last pic), and the rest of the column/wheel is TS-29, for comparison.

Finally, a dry fit to the chassis.

An overall shot of the engine - now complete - added air intake hoses:

Modifed the kit seatbelt mounts - they included the shoulder mounts, but no belts and no other hardware. The belt material I have is wider than the stock openings, plus the stock ones don't look very impressive - so I used the center part for the mounting pin, removed the stock belt guide, and cut a small slit in each with a P/E saw to mount the P/E bracket. Kit part is on the left, modded one on the right:

The other end is also a P/E piece, mounted to a square of 1mm thicker styrene - the styrene and the recess on the P/E part were then painted semi-gloss black. Here's the installed assembly - interior is now done.

I'm in the process of replacing the vents on the sides of the engine cover as well - I've got one side done, but probably won't get to the second til later in the weekend. Here's a comparison of the original solid part and the one side that is done. I'm thinking this is a single part on the 1/24 versions, so it might be a bit more difficult to pull off in that scale.

I decided to mold the Bertone logos off of the body, to sand them down and replace them with cast/Alclad chromed versions:


Here's where she stands now - next step is to get some paint on the body!