Ad blocker detected: Our website is made possible by displaying online advertisements to our visitors. Please consider supporting us by disabling your ad blocker on our website.
Started masking and praying paint on. It's not a difficult paintscheme but you sure can mess up.
Body in masking tape. Tamiya kind was used.
In the meanwhile the ordered tyres from Hiroboy came in. They look stunning and also have the right size since the tyres Goodyear used in 1976 were a little big bigger hence the disqualification of Hunt after the Spanish GP.
The little bag with two front, two rear and a template.
Out of the bag.
Above the Tamiya tyre compared to the MFH tyre below.
Painting done. I used RAL3024.
First I wanted to use the decal but decided to mask and paint.
Before decalling a light cote of clear was sprayed on the body.
Nosecone, cockpit and underbody clearcoted and waiting to dry completly before decalling.
Decals went on like a dream. MFH decals are very good to work with and adhere well. No problems at all.
Sarted working on the different parts for the monocoque. Pedals, gearshift, fireextinguisher etc. I'm also going to change the monocoque sides and there must be room for two extinguishers instead of one. Keep you posted.
After carefull studying of photograhps I decided to change the monocuque. I took off the paint and drilled all the rivetts out to make place for 0,4mm brass ones. I cut the fire extinquisher in three halves and mad two separate extinquishers. Therefore the monocoque had to changed. The place where the extinquishers go must be longer. Also made the gearlever. I made that out of ten different parts. Well enough said.
Taking off the Alclad II Polished Alu.
More cockpit detail.
Old situation.
New situation.
Closed the gap with plasticcard.
Cut the extinquisher in three parts.....
...Glued together...
...and made two out of one.
More plasticcard was used to close the gaps in the monocoque.
Modified cockpit with extinquishers in it for a dryfit.
Spraying black Alclad II prior to the Polished Alu.
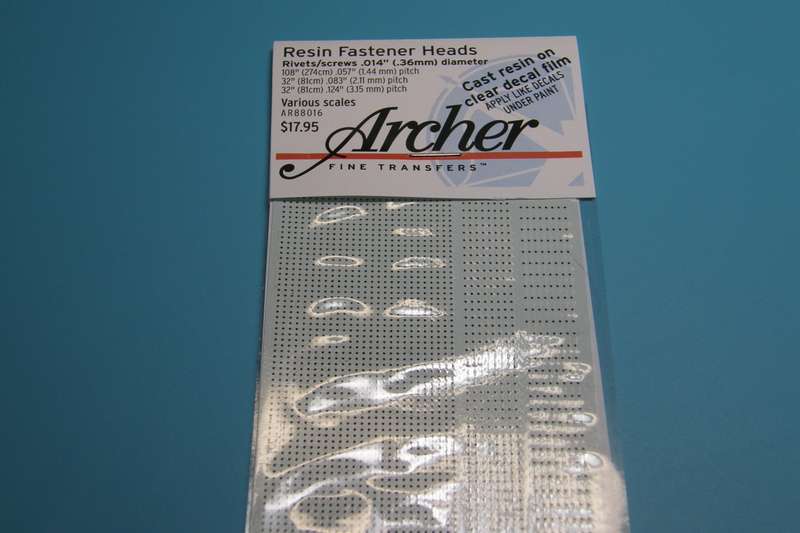
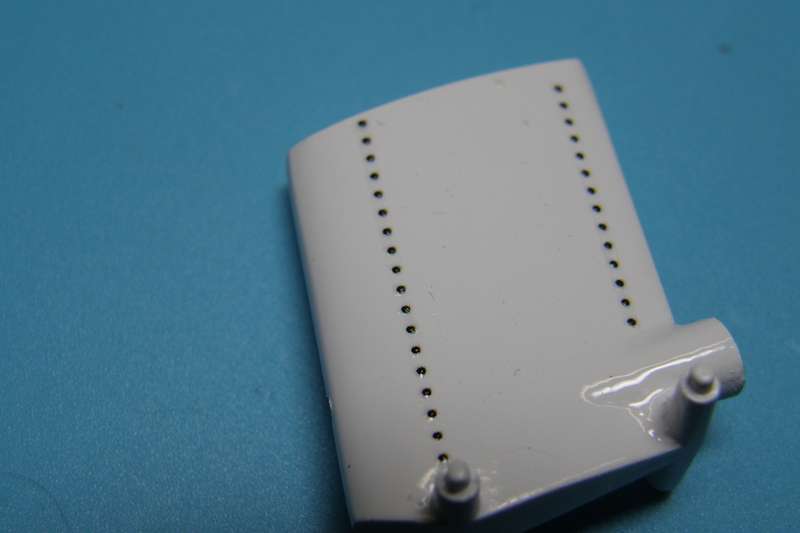
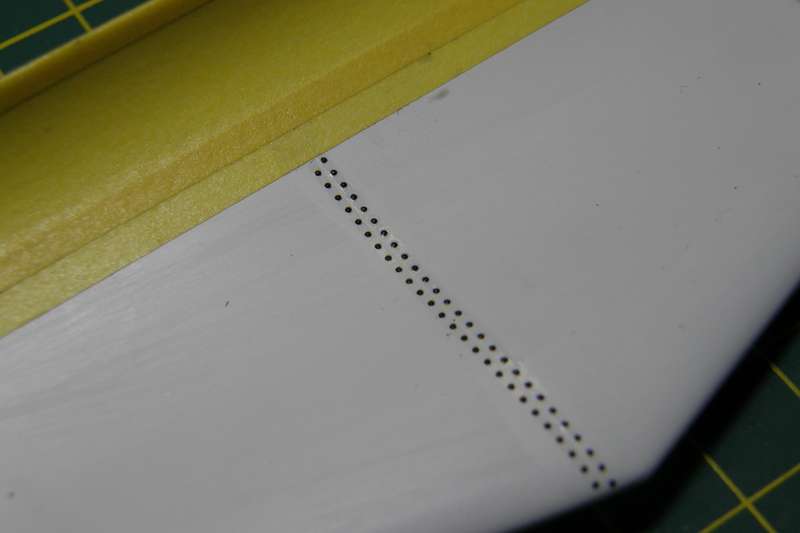
Before spraying Alu the rivets must be placed in the monocoque.
All rivets in place.
Again in Polished Alu.
Extinquishers painted, decalled and placed with metal strip.
Gearlever made out of ten different parts. Threaded nut, bold and washer is from Scale Hardware.
You might be interested to learn that I have just finished the 1/12 E-Jan Transkit to make Japanese GP Hunt M23. Looks fantastic I think but sadly after wasting many hours on the engine and cockpit, I had to make it as a curbside replica.
In my kit, the P/E sheets, decals, tyres and resin parts all perfect but the white metal parts are almost all useless. The front suspension parts were the worst (lower wishbones from the wrong kit I think, brake ducts the wrong shape, blanking plates prevent the front suspension sub-frame fitting in the chassis!) but elsewhere, the replacement oil tank actually prevents the roll cage fitting at all whilst the throttle linkage is missing from the engine and the nose subframe is about 1cm too long to fit inside the nose they provide. Somehow I got the rear suspension and rear wing to fit but they were the only white metal parts that even approximately worked! Am nervous about the Tyrrell 007 Transkit I have waiting, let alone the Lotus 79 and 97 MFH kits.....
Still finished Hunt car looks great - although nowhere near as good as yours will be. Really looking forward to seeing the finished kit. Good luck ewestra.
PS Would share a photo but all the ones I have taken are about 3mb - ie too large to upload.
Hugeprong wrote:You might be interested to learn that I have just finished the 1/12 E-Jan Transkit to make Japanese GP Hunt M23. Looks fantastic I think but sadly after wasting many hours on the engine and cockpit, I had to make it as a curbside replica.
In my kit, the P/E sheets, decals, tyres and resin parts all perfect but the white metal parts are almost all useless. The front suspension parts were the worst (lower wishbones from the wrong kit I think, brake ducts the wrong shape, blanking plates prevent the front suspension sub-frame fitting in the chassis!) but elsewhere, the replacement oil tank actually prevents the roll cage fitting at all whilst the throttle linkage is missing from the engine and the nose subframe is about 1cm too long to fit inside the nose they provide. Somehow I got the rear suspension and rear wing to fit but they were the only white metal parts that even approximately worked! Am nervous about the Tyrrell 007 Transkit I have waiting, let alone the Lotus 79 and 97 MFH kits.....
Still finished Hunt car looks great - although nowhere near as good as yours will be. Really looking forward to seeing the finished kit. Good luck ewestra.
PS Would share a photo but all the ones I have taken are about 3mb - ie too large to upload.
Reading this highlights just how important it is to test fit everything when using these transkits. I am also building the Hunt Japan GP car and although I have had similar problems (especially with the rear suspension, detailed here: http://www.f1m.com/forums/viewtopic.php?f=52&t=18115), it does build into a nice model. I didn't have an issue with the oil tank and roll bar though, mine have fitted OK. Thanks for the heads up about the nose subframe, I'll have to do some more test fitting!
Nice job on your version Eric. I wish I'd fitted double extinquishers now, but I'm too far along to change it.