
1/12 MFH 250F
-
 MarcoSaupe
- FOTA Vice Chairman

- Posts: 1611
- Joined: Fri Apr 27, 2007 2:10 pm
- Favorite F1 Team or Driver: HHF
- Location: Germany
- Contact:
- Status: Offline

Re: 1/12 MFH 250F
Very nice work, I'd really like to see a few 1/20 plastic kits of that era.
Marco
My Gallery: http://www.marcosaupe.de/modelle.html
My Gallery: http://www.marcosaupe.de/modelle.html
-
 blakebirk
Topic author - Backmarker

- Posts: 318
- Joined: Wed Jan 12, 2011 3:29 pm
- Your Name: Dan
- Favorite F1 Team or Driver: Ferrari fan
- Location: Seattle Wa.
- Status: Offline

Re: 1/12 MFH 250F
Got a bit of work done over the last few weeks,
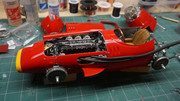
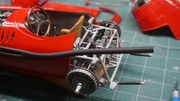
Installed the carburetor inlets and the photo etched airbox. I found out after putting the front engine cover on the airbox stuck out to far so the body work didn't align with the nose so I had to grind it down a little while it was in place. It worked out alright but future builders of this kit should test fit this before installing.
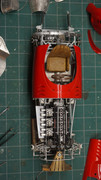

I also had a tough time getting all the carburetors aligned with the photo etched part so I had to do some grinding to open up some holes so things would align. In hindsight the photo etched part should be used as a template when installing the carbs on the engine.
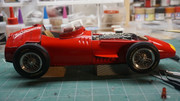
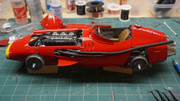
Body work installed
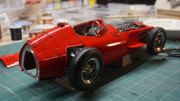
The fuel tank is just sitting there, I need to finish the tank that attaches to the back, I'm a little concerned with how the tail piece of body work will fit. The way it attaches looks questionable.
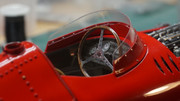
interior detail shot
Installed the carburetor inlets and the photo etched airbox. I found out after putting the front engine cover on the airbox stuck out to far so the body work didn't align with the nose so I had to grind it down a little while it was in place. It worked out alright but future builders of this kit should test fit this before installing.
I also had a tough time getting all the carburetors aligned with the photo etched part so I had to do some grinding to open up some holes so things would align. In hindsight the photo etched part should be used as a template when installing the carbs on the engine.
Body work installed
The fuel tank is just sitting there, I need to finish the tank that attaches to the back, I'm a little concerned with how the tail piece of body work will fit. The way it attaches looks questionable.
interior detail shot

Re: 1/12 MFH 250F
Wonderful..just wonderful ! 
Alex.
Alex.

Re: 1/12 MFH 250F
Wow, you can always tell when a master craftsman is plying his skills.
Rick
Rick
I feel the need for speed.


-
 M.Chriss
- Midfield
- Posts: 493
- Joined: Thu Oct 24, 2013 1:53 pm
- Your Name: Michael
- Favorite F1 Team or Driver: Ferrari
- Location: United States
- Status: Offline
Re: 1/12 MFH 250F
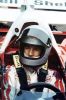
Brilliant build! This Instagram page has many photos of the 250F, including the '57 Monaco GP.
https://www.instagram.com/f1.history/
https://www.instagram.com/f1.history/
Michael Chriss
-
blakebirk
Topic author - Backmarker
- Posts: 318
- Joined: Wed Jan 12, 2011 3:29 pm
- Your Name: Dan
- Favorite F1 Team or Driver: Ferrari fan
- Location: Seattle Wa.
- Status: Offline
Re: 1/12 MFH 250F
Thanks for the kind comments,
I'm close to finishing this build up, its gone pretty well.
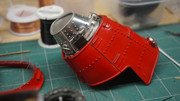
Finished up the rear tank, polished and replaced all the rivets with stainless steel ones from scale hardware.
The front end is done.
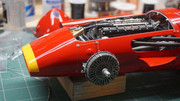
The fuel tank is done and ready to be installed.
I tried to use the photoetched strap that wraps around the middle of the tank but found that it would never conform to the shape of the tank, I found some red leather that I'll make the strap out of.
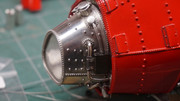
the back ready to be finished.
all that's left is the attachment of the fuel tank and I need to build one more wheel. stay tuned for the finished model.
I'm close to finishing this build up, its gone pretty well.
Finished up the rear tank, polished and replaced all the rivets with stainless steel ones from scale hardware.
The front end is done.
The fuel tank is done and ready to be installed.
I tried to use the photoetched strap that wraps around the middle of the tank but found that it would never conform to the shape of the tank, I found some red leather that I'll make the strap out of.
the back ready to be finished.
all that's left is the attachment of the fuel tank and I need to build one more wheel. stay tuned for the finished model.