GB WIP : Lotus 72E - Ebbro 1/20
-
- FOTA Vice Chairman
- Posts: 1950
- Joined: Wed Dec 19, 2012 4:36 am
- Location: UK
- Status: Offline
Re: GB WIP : Lotus 72E - Ebbro 1/20
Hi Chris,
Yet again, another great update!! I can't wait to see this wrapped up
Well done for correcting the VW syndrome
Cheers, H
Yet again, another great update!! I can't wait to see this wrapped up
Well done for correcting the VW syndrome
Cheers, H
-
- FOTA Chairman
- Posts: 4038
- Joined: Sun Apr 03, 2011 12:05 pm
- Location: Tokyo Japan
- Status: Offline
Re: GB WIP : Lotus 72E - Ebbro 1/20
Beautiful, beautiful work, Chris! I love it all!! A real inspiration!
Cheers,
Chris
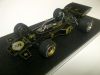
You know, I had the same problem with my Ebbro 72C kit (made from the same engine and suspension part molds, I assume). The rear ended up a bit twisted, even after I measured everything quite carefully, and (thought) it was perfectly level / horizontal as the Tamiya plastic glue was drying. That made the left front wheel lift off the ground about 1mm. But after several months in the display case, the model seems to have settled down. All four wheels are touching the ground now.CBartholomew4677 wrote:... Unfortunately, after everything was dry, I found that the rear suspension was tweaked/warped, so when resting with the tub flat on the ground ... the rear suspension is off.
Cheers,
Chris
Cheers,
Chris
-
Topic author - FOTA Chairman
- Posts: 3178
- Joined: Sat May 14, 2005 8:50 am
- Your Name: Chris Bartholomew
- Favorite F1 Team or Driver: Forza Ferrari!!!
- Location: Michigan, USA
- Status: Offline
Re: GB WIP : Lotus 72E - Ebbro 1/20
Hello All,
Thanks for the nice comments, always nice to hear feedback.
So, with the Chassis completed I have been able to turn my attention to the bodywork and decals.
As a general rule, I clear-coat over those decals which are part of the overall color scheme, and the gold line decals qualify in this case.......at least for me. So, after the black paint was fully cured, I proceeded as such:
- Mr. Super Clear Gloss : light coat x1
- Apply Decals
- Mr. Super Clear Gloss : mist coats x2
- Mr. Super Clear Gloss : heavy coats x2
Here is where they stand at the moment. The clear-coat really makes the gold decals stand out. Once the clear-coat is fully cured, it will be polished to get rid of the orange-peel, and even out the ridges from the decals.
For the cockpit surround, I wanted to paint the black portions (the major part) and not the kit decals to create the clear yellow windscreen separation. So, I photo-copied the decals, then used them to create a template from Tamiya tape. After any over-spray was cleaned up with some Tamiya polish, it was given the same steps as above, and we are currently in the "Decals having been applied"m stage, drying before the subsequent coats of clear-coat are applied. And here is where it stands. So, with the decals and clear-coat nearly completed, things are proceeding towards a true completion. Pending no further issues that is .
Onward and upward!!!
Cheers,
Chris
-
- Backmarker
- Posts: 308
- Joined: Sun Jun 26, 2011 11:17 am
- Location: Mesa, AZ USA
- Status: Offline
Re: GB WIP : Lotus 72E - Ebbro 1/20
Chris, Excellent paint work. Been following this build. I think you are doing a wonderful job! I like how you enhanced the kit.
Cheers, Jere
Cheers, Jere
-
- FOTA Vice Chairman
- Posts: 1950
- Joined: Wed Dec 19, 2012 4:36 am
- Location: UK
- Status: Offline
Re: GB WIP : Lotus 72E - Ebbro 1/20
Nearly there now, Chris The bodywork finish looks superb
What's next on the bench, when this one's done?
Cheers, H
What's next on the bench, when this one's done?
Cheers, H
-
- FOTA Chairman
- Posts: 3361
- Joined: Mon Apr 14, 2003 4:17 pm
- Location: Oxford. UK
- Status: Offline
Re: GB WIP : Lotus 72E - Ebbro 1/20
Nice one Chris, lovely finish sir.
Atb,Alex
Atb,Alex
-
Topic author - FOTA Chairman
- Posts: 3178
- Joined: Sat May 14, 2005 8:50 am
- Your Name: Chris Bartholomew
- Favorite F1 Team or Driver: Forza Ferrari!!!
- Location: Michigan, USA
- Status: Offline
Re: GB WIP : Lotus 72E - Ebbro 1/20
Hello All,
Thanks for the nice comments, always good to have feedback.
A little update.
Decaling has begun in earnest now. I am using the full replacement set from Tabu, as I want to apply the JPS livery in all its glory, and I've run into a little problem. Although things had been going on nice and cleanly, when I got to the nose, and applied the gold rondel, the wheels came off the wagon .
After some Micro-Set and a little Micro-Sol, it was left to dry, and upon my return, there decals had developed some significant black splotches . You can see here.
I assume this is due to the opacity (or lack thereof) of the decal, though all the others have been quite nice. I do have a back-up option to use the kit decals to fix this one, but I'm a little concerned about matching the color, and as the number is integral with the kit decal, I worry about the font matching exactly. However, I can worry all I want, the fact is I have no other options....... I guess we'll see how it works out.
Wish me luck.
Cheers,
Chris
-
- FOTA Vice Chairman
- Posts: 1950
- Joined: Wed Dec 19, 2012 4:36 am
- Location: UK
- Status: Offline
Re: GB WIP : Lotus 72E - Ebbro 1/20
That is a shame, Chris
All the best with the rescue mission!
Cheers, H
All the best with the rescue mission!
Cheers, H
-
- World Champion
- Posts: 614
- Joined: Sun Mar 16, 2003 8:27 pm
- Your Name: David
- Favorite F1 Team or Driver: Ferrari
- Location: Napier, New Zealand
- Status: Offline
Re: GB WIP : Lotus 72E - Ebbro 1/20
I had a similar issue with gold Studio 27 decals on a 2013 Citroen DS3 WRC car.... The gold took on a blotchy appearance where I'd used MicroSet / Sol... Luckily I spotted it after one decal, and just used a hairdryer on the rest, instead of solvent....
-
Topic author - FOTA Chairman
- Posts: 3178
- Joined: Sat May 14, 2005 8:50 am
- Your Name: Chris Bartholomew
- Favorite F1 Team or Driver: Forza Ferrari!!!
- Location: Michigan, USA
- Status: Offline
Re: GB WIP : Lotus 72E - Ebbro 1/20
Well, I applied the kit decal over the blemished decal on the nose, and catastrophe averted
In order to have some consistency, I applied the kit decals to the side pod number areas as well, and somehow the black blotchiness came through in a big way!!!! No Micro-Set/Sol this time, so I'm lost what happened. I now have a problem, because I've used both sets of decals, and have no more spares .
I can't leave this the way it is. Any ideas? I am struggling to believe I can make a set work properly.
Gotta seriously think about this one........
Cheers,
Chris
....on the nose....but the side pods are a different story altogether In order to have some consistency, I applied the kit decals to the side pod number areas as well, and somehow the black blotchiness came through in a big way!!!! No Micro-Set/Sol this time, so I'm lost what happened. I now have a problem, because I've used both sets of decals, and have no more spares .
I can't leave this the way it is. Any ideas? I am struggling to believe I can make a set work properly.
Gotta seriously think about this one........
Cheers,
Chris
-
- Similar Topics
- Replies
- Views
- Last post
-
- 14 Replies
- 522 Views
-
Last post by gp-models
-
- 8 Replies
- 445 Views
-
Last post by scaleautofactory