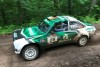
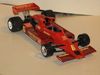
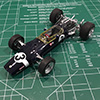
Hello all. I began this kit 15 years ago or so, and decided now its time to finish it. Not my favorite subject, however, during research I learned an awful lot about this car, and can now appreciate the engineering and design much more than I ever did before. Building models is an EDUCATIONAL experience. I didn't get crazy doing detail, just building it out of the box and opening the exhaust pipes with a tiny drill bit. Too bad the engine doesn't show more, but I took some photos of the build in action with the frame, fuel tanks and suspension/steering parts shown. Here are the photos of the final result, completed just this morning....
https://i.postimg.cc/0y1QJxLb/IMG-0468-1.jpg
https://i.postimg.cc/R0BqH9Jg/IMG-0341.jpg
https://i.postimg.cc/B6CSDKf6/IMG-0477.jpg
https://i.postimg.cc/fR3YKwLZ/IMG-0462.jpg
https://i.postimg.cc/XNHZDTtv/IMG-0479.jpg
https://i.postimg.cc/bwKkVKDn/IMG-0454.jpg
Auto Union Type D 1/32 scale
-
 steveracer
Topic author - F2 Champion

- Posts: 177
- Joined: Sun Feb 15, 2015 8:55 am
- Favorite F1 Team or Driver: Shadow
- Location: West Bloomfield, Michigan
- Status: Offline

-
 tubegenius
- Top Designer

- Posts: 701
- Joined: Fri Jun 21, 2013 4:43 pm
- Favorite F1 Team or Driver: Honda powered teams
- Location: Michigan, USA
- Status: Offline

Re: Auto Union Type D 1/32 scale
Very cool. What did you use for the silver paint? It would probably be a fingerprint nightmare for me. What part of Michigan are you in?
-
steveracer
Topic author - F2 Champion
- Posts: 177
- Joined: Sun Feb 15, 2015 8:55 am
- Favorite F1 Team or Driver: Shadow
- Location: West Bloomfield, Michigan
- Status: Offline
Re: Auto Union Type D 1/32 scale
I used Testors "chrome" paint. It set up for, what, maybe 10 years or so....nonetheless it was spotless, until my latex gloves tarnished part of it....the photos don't show all the sins that I easily recognize, lol.
I am in West Bloomfield. Time to hit the bed so that I can make it in to work tomorrow!
I am in West Bloomfield. Time to hit the bed so that I can make it in to work tomorrow!
-
 marlborored
- FOTA Chairman

- Posts: 2523
- Joined: Thu Apr 22, 2004 1:45 pm
- Favorite F1 Team or Driver: McLaren, Senna; Lotus, Clark
- Location: Honolulu, Hawaii
- Status: Offline
Re: Auto Union Type D 1/32 scale
Very nice build!!
-
 CK
CK
- Constructors Champion

- Posts: 1311
- Joined: Mon Mar 06, 2006 9:38 am
- Your Name: C K
- Favorite F1 Team or Driver: Mercedes, McLaren, Williams
- Location: Canada
- Status: Offline

Re: Auto Union Type D 1/32 scale
What a beautiful model!
You have done a great job. It looks more like a model in 1/24 or even 1/20 scale.
This kit was re-released by Revell about 10 years ago. It is one of the better kit in this Matchbox series.
You have done a great job. It looks more like a model in 1/24 or even 1/20 scale.
This kit was re-released by Revell about 10 years ago. It is one of the better kit in this Matchbox series.
C K
Canada
Canada
-
 vekkuli
- FOTA Chairman
- Posts: 4438
- Joined: Wed Dec 21, 2005 3:20 pm
- Favorite F1 Team or Driver: Stake Sauber
- Location: Oulu-Uleåborg Finland
- Status: Offline

Re: Auto Union Type D 1/32 scale
Looks so real  !
!
My completed Models:
https://www.flickr.com/photos/150229040 ... 3349714787
https://www.flickr.com/photos/150229040 ... 3349714787
-
 whatisdeletrazdoing
- Midfield

- Posts: 467
- Joined: Fri Jul 01, 2016 2:14 am
- Favorite F1 Team or Driver: Super Aguri, Ligier, Minardi, Rial
- Status: Offline
Re: Auto Union Type D 1/32 scale
Looks great! Awesome engine detail and that silver is spectacular.
-
steveracer
Topic author - F2 Champion
- Posts: 177
- Joined: Sun Feb 15, 2015 8:55 am
- Favorite F1 Team or Driver: Shadow
- Location: West Bloomfield, Michigan
- Status: Offline
Re: Auto Union Type D 1/32 scale
Hey guys, thanks for all the replies. I was afraid to put it together as I wasn't sure what the silver would look like after I handled it. I think the photos are flattering, certainly not the harsh truth of the camera's eye on this one. I never thought that Matchbox/Lesney would have created such a nice model. The sprues are really weird, in that one side of them are perfectly flat....never seen that before from a mold. I used basically a series of silver and gray colors to create some contrast in the engine compartment. One thing I need to still do is trim the left exhaust cutout on the engine cover a bit more so that is sits a bit better. And the decals, oldies and goodies, it looked like Elmer's glue was used as the adhesive, but they still turned out pretty well. Even used some Solvaset and careful prodding.
Had to get it done as I started it. Now I have to use that same logic on the FW 14b and get it done...
Had to get it done as I started it. Now I have to use that same logic on the FW 14b and get it done...