Tamiya 1/12 McLaren MP4/6 w/ upgrades

Re: Tamiya 1/12 McLaren MP4/6 w/ upgrades
Did the rear brake assembly with Top Studio upgrades and again very impressed with their bits. Pretty easy to assemble with some patience. I painted the brake discs with CF paint. Once assembled I glued it to the uprights. CF the brake ducts with 1/24 scale patterns as I will with everything. I scratch build my own inner panels for the brake ducts out of very very thin plastic and glued It to ducts primered painted black followed by CF and then added TS PE bits for the brake ducts. Didn’t do much to the uprights except I put plastic studs where the calipers will mount because Im going to use nuts w/ studs on the calipers and so the calipers will seat on those studs. Don’t want to use tamiya screws and they are not realistic. Top wishbones were thinned down to scale painted and glued on with RB motion hardware again no screws.
- Attachments
-
-
-
-
-
Re: Tamiya 1/12 McLaren MP4/6 w/ upgrades
I received an email from Paul of Thunder Valley and he tells me that he is back in business after being sick and revamping his website with help of his son. He told me he was ready to receive orders.

Re: Tamiya 1/12 McLaren MP4/6 w/ upgrades
You're making fast progress - a lot faster than mine is going!
Looking at your gearbox casting colour made me review mine. I already re-painted it twice becasue I wasn't happy with it, but this time I think it might be too light, even allowing for a bit of weathering powder I was going to add. Luckily There's not much that was permanently fitted, so I might have another go. The only thing stopping me was the temp strips on the rear casing, but I must have acquired another set of decals at some point, so I can re-apply them.
Looking at your gearbox casting colour made me review mine. I already re-painted it twice becasue I wasn't happy with it, but this time I think it might be too light, even allowing for a bit of weathering powder I was going to add. Luckily There's not much that was permanently fitted, so I might have another go. The only thing stopping me was the temp strips on the rear casing, but I must have acquired another set of decals at some point, so I can re-apply them.
Re: Tamiya 1/12 McLaren MP4/6 w/ upgrades
The magnesium casing is definitely darker in real person. I believe I got very close to it. If you want to get real anal you can add aluminum where they machine the casing to flatten it where the studs go thru for the nuts. The gearbox is curved more so on the front end from pictures of the real gearbox. Tamiya is more angular. If you notice on my first pics I sculptured by gearbox at the front end and right side cover with putty and sanding to make it look more realistic. Another reason why I decided to do the gearbox this way. Easier without the suspension and bell crank brackets on.
I put in about 4 hours a day since I’m in lock down so hence the progress. I’m done with the gearbox for now and will finish it off at a later time. I’m working on the bodywork now and will have pics next week
I put in about 4 hours a day since I’m in lock down so hence the progress. I’m done with the gearbox for now and will finish it off at a later time. I’m working on the bodywork now and will have pics next week
Re: Tamiya 1/12 McLaren MP4/6 w/ upgrades
For some reason I got a second sheet of decals. If you need those temp decals I can mail them to you.
Re: Tamiya 1/12 McLaren MP4/6 w/ upgrades
Yes, I will re-paint the gearbox. Re. the spot-faces on the casting - I did flat the plastic on the triangular protrusions adjacent to the engine, but I didn't paint them silver. I think my flats are a bit crude, and not circular. Still, it had to be done in order to fit a washer behind the nut. There is also a prominent gap at the 'box/engine joint line there which will need looking at.Jose01jr wrote:The magnesium casing is definitely darker in real person. I believe I got very close to it. If you want to get real anal you can add aluminum where they machine the casing to flatten it where the studs go thru for the nuts. The gearbox is curved more so on the front end from pictures of the real gearbox. Tamiya is more angular. If you notice on my first pics I sculptured by gearbox at the front end and right side cover with putty and sanding to make it look more realistic. Another reason why I decided to do the gearbox this way. Easier without the suspension and bell crank brackets on.
I put in about 4 hours a day since I’m in lock down so hence the progress. I’m done with the gearbox for now and will finish it off at a later time. I’m working on the bodywork now and will have pics next week
Thanks very much for the offer of the decals, but as I mentioned, for some reason I also have a duplicate set in my box. I have no idea where it came from. Maybe Tamiya put two sheets in some boxes by mistake?
Looking forward to more updates. Cheers.
Re: Tamiya 1/12 McLaren MP4/6 w/ upgrades
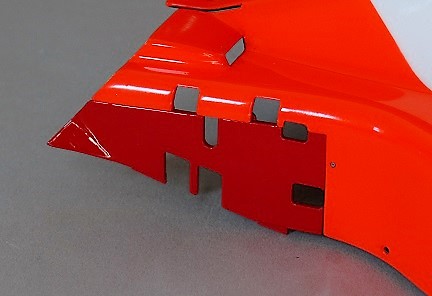
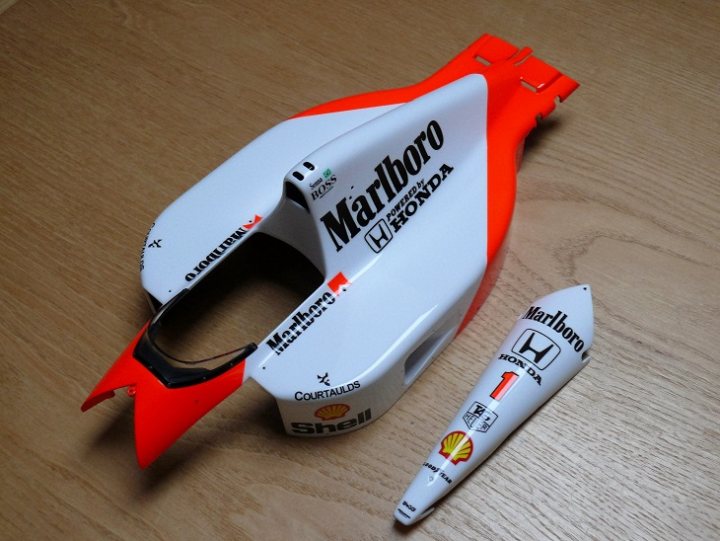
As I said in my last post, I’m done for now with the gearbox and so I am now focusing on the bodywork as I thought it was a good idea until I get more bits from the mail for the tub. I started off with the easy bits. With all these pieces it’s pretty straightforward and the only thing I would add is that I used Tamiya Flourescent Red and not the other paints other hobbyist use. The color was perfect as I recall and very easy to apply with my airbrush. I gave it several coats after priming it with Tamiya grey primer. For the damper cover I used the white paint Tamiya recommend it and it’s fine. I applied the decals but not sure if I’ll apply a clear coat as I don’t like my race cars shiny. For now I will probably just wax it. Underside of the damper cover I applied CF decals and added black smoke very lightly, just a single coat. Very subtle as I want to see the carbon weave but just slightly. I did the same thing to the rear endplates. I cut the decals as close as posible to remove the clear film. Applied Micro Set and that’s about it. The only thing I didn’t like was the color of the numbers aren’t a very good match with the Tamiya paint as it looks more orangie . Working on the engine cover and will have details of that by the end of the weekend.
- Attachments
-
-
-
Re: Tamiya 1/12 McLaren MP4/6 w/ upgrades
There are several threads on here about M@r!b*r* red, for example:
https://www.f1m.com/forum/viewtopic.php?f=26&t=18102
It's actually flourescent orange - it's your number decal that's probably correct. The actual paint code is RAL3024. I found the Tamiya Flourescent red is very inconsistent is shade, and darkens and loses its luminoscity with age.
This is a direct comparison between my Tamiya TS-36 and RAL3024:
RAL3024 is also a perfect match for Decalpool decals:
The Tamiya decals are also the correct shade, but mine at least aren't flourescent enough - probably faded with age. The colour is exactly how I remember M@r!b*r* sponsored cars to look back in the '90's - almost flourescent enough for sunglasses!
Thanks.
Re: Tamiya 1/12 McLaren MP4/6 w/ upgrades
Are those decals from the kit or from another supplier? I just painted my engine cover and the color looks correct from what I remember so I’m happy with it. Time will tell if the color changes but I’m not putting a clear coat as I’ve heard it changes the color over time. I’m just going to polish it. I’m thinking my decals are off because definitely the color of the numbers are off. FYI I’m taking pics from an old iPhone so there’s that too. I’ll take a pic of the engine cover over the weekend.
Re: Tamiya 1/12 McLaren MP4/6 w/ upgrades
The Decals I ended up using were from Decalpool:Jose01jr wrote:Are those decals from the kit or from another supplier? I just painted my engine cover and the color looks correct from what I remember so I’m happy with it. Time will tell if the color changes but I’m not putting a clear coat as I’ve heard it changes the color over time. I’m just going to polish it. I’m thinking my decals are off because definitely the color of the numbers are off. FYI I’m taking pics from an old iPhone so there’s that too. I’ll take a pic of the engine cover over the weekend.
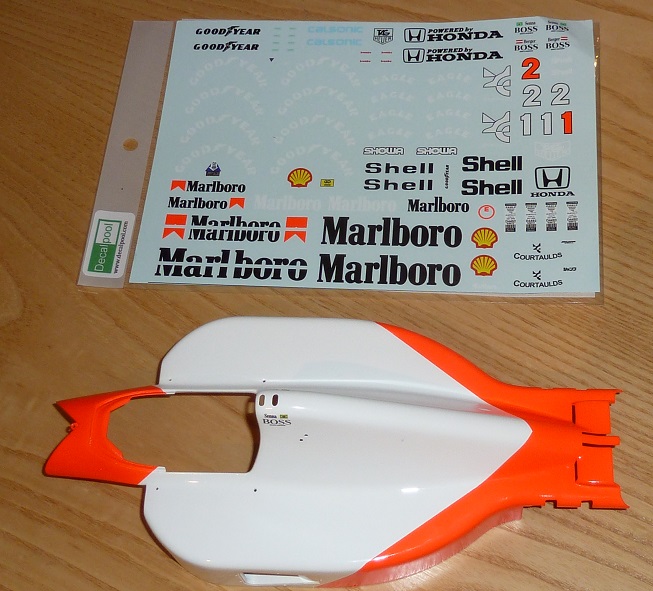
They were very good quality. Initially, I tried to use the Tamiya ones, but they disintegrated. I also had some Tabu design M@r!b*r* logos, but I ended up going with the Decalpool ones pretty much throughout. Somehow I ended up with two sets of Tamiya decals, one set was the correct orange, the other was far more red. Decalpool were spot-on the correct RAL orange, and very opaque and flourescent. As I mentioned, the orange was a perfect match for RAL3024. I used automotove paint from a local supplier, applied with the airbrush.
The whole terrible body colour/decal saga is from page 10 of my current build thread, it goes on forever. I'm glad it's over tbh, although I still need to paint another rear wing and rear suspension infill set for the second (bare chassis) version.