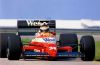


Its one of my favorite F1 cars ever so i really want to step up my game and make this as good as possible. the paint i'm using is mostly Zero Paints. upgrade parts i'm using are from MFH and Top studio. I have lots of pictures so this will be a long post and i hope you enjoy it.
Pictures:

The Headrest didn't seem to fit well so needed to fill it.

Adding some PE parts from Studio27

Drilled some holes in the brake discs to add more detail. They are not perfect but i haven't done anything like this so far and it looks kinda okay.

Found out there was alot of 'flesh' on the exhausts. i modyfied them using a sharp blade and a dremel.

The work done on the left sidepod:


the right sidepod had alot of issues. I decaled the cf but forgot to paint some little bits on them so i masked it because it was cleared a few days before ( used flat alclad ) But it felt sticky and by removing the masking tape some of the decals sticked to the tape. i tried my best to recover most of the decal.


Next up are the enginecovers. added some mfh bolts and top studio rivets to them:


Then the rear shocks. never tried this before and it wasn't easy at all since the dimensions supposed to be the same but i didn't know the top studio shocks needed to be compressed in order the have a good fit.


Paint was also aplied. I used the zero paint leyton house colour and for the green i used the dark green from the jordan 191 set which is a good match to the studio27 decals.

next up some wires on the engine and some bolts on the suspension:


What the buils looks like atm (everything is dryfitted at this stage)


I know its a long post and not everything is covered as you can see so feel free to ask things about the build. I hope you enjoy it and i hope to keep you guys updated on this build!