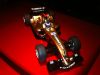


It's been a long while since I've built a 1/20 kit. I've been flirting with NASCAR and sportscars lately, but I'm going back to my first love - F1. My return to F1 modeling is the Tamiya 1/20 Tyrrell P34. A while back I bought a big box of Tamiya spares to cannibalize for other projects. While sorting out the parts, I discovered there are near complete kits of the Ferrari 640, Williams FW07, and Tyrrell P34.
I have decals from Studio27 for the Japanese GP, and I was intending to build Depailler's car from that race. But, I just have slick tires so I'll built the British GP version instead. I've tried to stay close to the real car, but there will naturally be some omissions and inaccuracies.

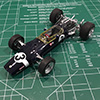
Here's the engine and rear end mostly finished. It's not my best work, but it'll get the job done. I've added some brake wiring, and once I get the car together I'll add radiator plumbing.

Here are the rear tires with the lettering painted with a slew of toothpicks. I was unable to paint the front tire letting because they've so small and I'm not that great. The wheels are painted in Tamiya acrylic black. I was having trouble with my airbrush and the paint came out splattered, but after a coat of Mr. Color Diamond Cut flat lacquer the paint smoothed out. I love that Mr. Color paint!

Here's the front suspension. It's nothing special aside from brake wiring. I didn't bother with the discs and calipers as they'll be covered by the wheels.
More to come!
Jake