

Wonderful work in progress to follow. BTW the comments on the bolt colors are interesting. I worked for Porsche and Mercedes-Benz in the 70's, 80's and 90's. Parts Manager. The bolts and nuts were referred to as Cad plated or Cadmium. I think they are still used and available for the 1/1 cars.
Dave
MFH 911 Carrera RSR Turbo
-
-Felix-
- F2 Champion

- Posts: 149
- Joined: Tue Apr 23, 2013 4:31 am
- Your Name: Felix
- Favorite F1 Team or Driver: Jim Clark
- Location: Green Hell
- Contact:
- Status: Offline

Re: MFH 911 Carrera RSR Turbo
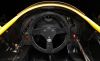
That dashboard is a masterpiece, truly a model of it's own! But that you can say about the drivetrain as well, as well as the suspension etc....
Only thing is, it looks very much slanted upwards (the dials), but that might be because of the test fitting only.
Only thing is, it looks very much slanted upwards (the dials), but that might be because of the test fitting only.


Re: MFH 911 Carrera RSR Turbo
Superb Uli, i even can read the VDO bagde on the instruments, truely impressing!
I love the research side of these jobs too, it`s like sinking into the construction of a car and understanding the technical side to reset everything and bring it to scale. Sometimes it can take a while till you have a good collection of datas, references and what else is needed to start such a project, i only can imagine how nuch effort you put in this part of modeling before even unboxing the kit itself, then taking all mesurements to make parts fit and all the design chapter for the new parts, realy realy impressing how far yo covered all that details!
.....LIKE IT!!!
Take a stand!
-
Leftkeys
- F2 Champion
- Posts: 173
- Joined: Tue Nov 21, 2017 10:57 am
- Your Name: Bill
- Favorite F1 Team or Driver: Lotus, McLaren, Ferrari
- Location: Scottsdale, AZ, USA
- Status: Offline

Re: MFH 911 Carrera RSR Turbo
Guido, I agree, this is beautiful. Uli, I think I missed a few of these updates...must have been the heat. The dashboard is special, watching the progress is even more interesting. It’s inspirational.
-
 VR2
VR2
Topic author - F2 Champion
- Posts: 184
- Joined: Mon Jul 13, 2015 2:22 pm
- Your Name: VR2
- Favorite F1 Team or Driver: Ferrari, Gilles Villeneuve
- Contact:
- Status: Offline
Re: MFH 911 Carrera RSR Turbo
Hi there, little progress made since my last post due to "summer break". Nevertheless a small update during the "saure Gurkenzeit/sour cucumber time" as we say in Germany 
First and foremost, many thanks for your nice comments and Felix, as you've correctly noticed, the dashboard was slanted to much upwards during the testfit as the assembly was not yet glued in place. When glued in place, it will have the correct position.
The dashboard is completely finished now, including the steering wheel and ready for installation
This picture provides an overview about the individual parts (only 3 MFH kit parts used, the rest is new)
... likewise an overview about parts used for the steering wheel (100% new parts)
some pictures about building the steering wheel including mounting device
Also started to build the driver seat ...
... modified seat frame
Next is to paint and upholster the seat and to "laminate" it to the frame.
Thanks for watching !
BR,
Uli
First and foremost, many thanks for your nice comments and Felix, as you've correctly noticed, the dashboard was slanted to much upwards during the testfit as the assembly was not yet glued in place. When glued in place, it will have the correct position.
The dashboard is completely finished now, including the steering wheel and ready for installation
This picture provides an overview about the individual parts (only 3 MFH kit parts used, the rest is new)
... modified seat frame
Thanks for watching !
BR,
Uli
-
Inuyasha
- F1 Test Driver

- Posts: 210
- Joined: Sat Dec 07, 2019 12:29 pm
- Favorite F1 Team or Driver: Senna
- Status: Offline
Re: MFH 911 Carrera RSR Turbo
Awesome work, absolutely stunning!
-
 Seema
Seema
- F1 Test Driver
- Posts: 281
- Joined: Tue Aug 09, 2016 5:27 am
- Your Name: Martin Seelos
- Favorite F1 Team or Driver: Lotus, Williams, Toleman, Mclaren.
- Location: Innsbruck
- Status: Offline

Re: MFH 911 Carrera RSR Turbo
With every new post it is anticipation what he will show us. And it knocks my socks off. The attention to detail and what is actually possible inspires me every time anew. Very good work.
Seema
-
 shurick
- F2 Champion
- Posts: 116
- Joined: Mon Jan 11, 2016 9:00 pm
- Location: Toronto, Canada
- Status: Offline
Re: MFH 911 Carrera RSR Turbo
I am waiting for this to finish so I can use it as a reference for my build. This is great stuff and pretty much as good as real car pics. Cheers!
-
VR2
Topic author - F2 Champion
- Posts: 184
- Joined: Mon Jul 13, 2015 2:22 pm
- Your Name: VR2
- Favorite F1 Team or Driver: Ferrari, Gilles Villeneuve
- Contact:
- Status: Offline
Re: MFH 911 Carrera RSR Turbo
Hi there, summer break is over and work on the RSR continues. Now it continues with a little update ...
Both seats are finished and ready for installation. To emulate the texture of the glass-fibre structure and the ultra thin lamination around the seat frame, a modeling friend of mine has developed a "technique", which leads to fantastic results. It's basically a wet-in-wet painting technique with a brush using different shades of brown, yellow and white Acrylic paints. The lamination was done with pieces cut from a disposable latex gloove:
The Dashboard with steering wheel got installed and the driver seat test fitted:
A new fuel filter (not included in the MFH kit) has been made and connected accordingly:
On the right side of the engine bay, there is a oil catch tank, which is included in the kit but with lacking details. So a new part has been designed and 3D printed:
Next is to install the cage and to finish the rolling chassis.
BR, Uli
Both seats are finished and ready for installation. To emulate the texture of the glass-fibre structure and the ultra thin lamination around the seat frame, a modeling friend of mine has developed a "technique", which leads to fantastic results. It's basically a wet-in-wet painting technique with a brush using different shades of brown, yellow and white Acrylic paints. The lamination was done with pieces cut from a disposable latex gloove:
BR, Uli