
To help decals to settle on uneven surface, Tamiya suggests to use a hot towel to press it down slowly. I have use this method before and it really help. Try to fix the high points first and fix the decal into the low points.
For complex shapes you have to use multiple sections. Don't worry, the real parts are made like this a lot of times.
As for paint bleeding through mask, you can either seal the mask edge with clear paint or the color that the mask is to cover. Once the seal is dry, you can paint the next color.
Peugeot 905 evo 1 bis / Heller 1/24
-
 CK
CK
- Constructors Champion

- Posts: 1311
- Joined: Mon Mar 06, 2006 9:38 am
- Your Name: C K
- Favorite F1 Team or Driver: Mercedes, McLaren, Williams
- Location: Canada
- Status: Offline

Re: Peugeot 905 evo 1 bis / Heller 1/24
C K
Canada
Canada

Re: Peugeot 905 evo 1 bis / Heller 1/24
Thank you Very much. These are Very usefull, I Will try these tips For sure.CK wrote:To help decals to settle on uneven surface, Tamiya suggests to use a hot towel to press it down slowly. I have use this method before and it really help. Try to fix the high points first and fix the decal into the low points.
For complex shapes you have to use multiple sections. Don't worry, the real parts are made like this a lot of times.
As for paint bleeding through mask, you can either seal the mask edge with clear paint or the color that the mask is to cover. Once the seal is dry, you can paint the next color.
-
 daveyman
- FOTA Chairman

- Posts: 4540
- Joined: Sun Jun 24, 2007 11:39 am
- Favorite F1 Team or Driver: Riccardo Patrese
- Location: Hull, England.
- Status: Online

Re: Peugeot 905 evo 1 bis / Heller 1/24
When I'm getting tricky decals to conform to uneven surfaces I use microsol and a hairdryer, apply the microsol, let it wet the decal for a couple of minutes and then give it a light warming with the hairdryer. Repeat this process a few times. Everything Gradually settles down perfect, no wrinkles. CAUTION, be careful with the hairdryer not to overwarm the plastic, just a light warming.
Re: Peugeot 905 evo 1 bis / Heller 1/24
Some paint jobs done. Some Will need a little correction.
- Attachments
-
-
-
-
-
-
-
Re: Peugeot 905 evo 1 bis / Heller 1/24
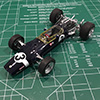
Another little progress today.
Add Carbon , extra wires, seatbelts and Some decals to the cockpit drivers section.
First time I try this. For the moment, I’m pretty happy with the result.
Add Carbon , extra wires, seatbelts and Some decals to the cockpit drivers section.
First time I try this. For the moment, I’m pretty happy with the result.
- Attachments
-
-
-
 whatisdeletrazdoing
- Midfield

- Posts: 467
- Joined: Fri Jul 01, 2016 2:14 am
- Favorite F1 Team or Driver: Super Aguri, Ligier, Minardi, Rial
- Status: Offline

Re: Peugeot 905 evo 1 bis / Heller 1/24
Looking great! Very nice work on the cockpit tub. That extra carbon decal work has really paid off.
Re: Peugeot 905 evo 1 bis / Heller 1/24
Thanks, The kit really needs some personal touch to improve it. So I try to do my best to make it look better.whatisdeletrazdoing wrote:Looking great! Very nice work on the cockpit tub. That extra carbon decal work has really paid off.
The carbon decals took like forever but it really paid off.
-
 Indy1977TX
- Minor Constructor

- Posts: 945
- Joined: Mon May 13, 2013 11:39 pm
- Favorite F1 Team or Driver: Penske Racing
- Status: Offline
Re: Peugeot 905 evo 1 bis / Heller 1/24
The detailing is really making this an awesome build of a very sub-par kit.
Jordan
Jordan
-
 Jeff
Jeff
- FOTA Chairman
- Posts: 2757
- Joined: Wed Jan 25, 2006 1:36 am
- Location: Melbourne, Australia
- Status: Offline
Re: Peugeot 905 evo 1 bis / Heller 1/24
Looking very good
Re: Peugeot 905 evo 1 bis / Heller 1/24
Another update.
Still struggling with the tamiya extra thin paint eating into my paint job. So retouching is necessary. Trying to glue the cockpit, engine to the chassis. The body should fit correctly.
Added Some decals. I’m using a mixture of the original sheet and an extra shunko sheet.
Hope you like it So far.
Still struggling with the tamiya extra thin paint eating into my paint job. So retouching is necessary. Trying to glue the cockpit, engine to the chassis. The body should fit correctly.
Added Some decals. I’m using a mixture of the original sheet and an extra shunko sheet.
Hope you like it So far.
- Attachments
-
-
-