The kit arrived partially started and needed a lot of cleanup. Fortunately I was able to strip all the paint with a simple bath of 99% alcohol. After all the parts were cleaned up I started assembling all the main body pieces before painting. I was able to get away with using filler by applying a lot of Tamiya extra thin cement and sanding down the seams. I also scribed the panel lines with the back of a #11 x-acto.

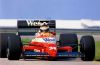
As I was working on my SF70H simultaneously, I took a pic of the two cars side by side. I realize these types of pics have been posted before but it's crazy to see how much larger the newer generation of cars have gotten.

After the body was cleaned up I covered it in Splash Paints white primer, sanded down some more imperfections, and applied one final coat. You can probably see some red from the plastic seeping through the primer. Luckily some final mist coats of primer took care of that. I'm not concerned about the bleed through with the parts that will be painted red, though I will spraying a base coat of silver for the parts that will be painted white; the front wing main-plane and both rear wing elements.


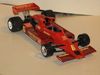
Yesterday I sprayed the Gravity Colors Ross Scuderia and it laid down beautifully with a semi-gloss sheen. I also painted the nosecone, front and rear wing endplates, and other bits red but didn't take pics of those. I will wait for this to gas out (It stinks!) then apply a thin layer of clear for the decals followed by a final coat of 2K clear.


I also worked on most of the engine bay and other mechanical components. The engine block and radiators were painted with Alclad Aluminum. All the black parts were painted with decanted TS-29 semi gloss black, and used random colors/shades of Alclad for the suspension wishbone joints and other parts. I will probably try to finish these while I want for the paint to gas out.


More to follow!