WIP: Lotus 88 USA 1981 Elio De Angelis
-
 RE60B
RE60B
- FOTA Vice Chairman

- Posts: 1801
- Joined: Thu Jan 24, 2013 1:35 pm
- Your Name: Cédric
- Favorite F1 Team or Driver: RENAULT
- Location: ANTIBES
- Status: Offline

Re: WIP: Lotus 88 USA 1981 Elio De Angelis
go go GOOOOOOOOOOOOOOOO! and what painting you have done.. 
-
 Eagle50
- FOTA Chairman

- Posts: 4038
- Joined: Sun Apr 03, 2011 12:05 pm
- Location: Tokyo Japan
- Status: Offline
Re: WIP: Lotus 88 USA 1981 Elio De Angelis
Yes, the paint looks great, Sergey!
-
 billgtp
- FOTA Chairman
- Posts: 2409
- Joined: Sat Jan 26, 2002 5:27 pm
- Favorite F1 Team or Driver: Chapmans Lotus, James Hunt
- Location: Anza ca.
- Status: Offline

Re: WIP: Lotus 88 USA 1981 Elio De Angelis
Looking good. Nice work

Re: WIP: Lotus 88 USA 1981 Elio De Angelis
Great work Sergey. How did the chrome decals go with the clear coat (very interested as I have this kit and haven't started it yet as the chrome decals and clear coat conundrum put me off)
Shaun
Shaun
-
 lezdep
Topic author - FOTA Chairman
- Posts: 3623
- Joined: Tue Aug 23, 2005 2:42 am
- Favorite F1 Team or Driver: Senna
- Location: Toronto
- Status: Offline

Re: WIP: Lotus 88 USA 1981 Elio De Angelis
I have not put other decals and clear coat over chrome decals yet. This is my current dilemma and big blocker for this build.
I like how blue parts with chrome decals applied on them look and I think they are more accurate to original. I think that's how
they would have been done on 1:! car. However, because decals cover all the surface of side panels, I am concerned of them
not sticking well and coming off in the future. Usually decals only cover portions of the parts and I relay on clear coat to hold
them down. In case of this build, clear coat might not be able to do that. I actually already have some edges of the decals
not sticking fully to the parts.
So, as alternative I've also masked and sprayed factory chromed parts with blue from inside. But I don't like how factory
chromed parts look. Not as accurate to original as I would like.
Cannot decide at present which way to go. Should I used parts covered in chrome decals and hope that final clear coat will
hold them. Or should I use factory chromed parts instead.
Yet, how clear coat will hold on over chrome decals or factory chrome is an unknown factor at present. I have only one set
of decals and only one chance to get it right. Really puzzled with this dilemma at the moment.
shood23 wrote:Great work Sergey. How did the chrome decals go with the clear coat (very interested as I have this kit and haven't started it yet as the chrome decals and clear coat conundrum put me off)
Shaun
Sergey's Blog - http://lezdep.blogspot.com/ | Public Gallery - http://picasaweb.google.com/lezdep
-
lezdep
Topic author - FOTA Chairman
- Posts: 3623
- Joined: Tue Aug 23, 2005 2:42 am
- Favorite F1 Team or Driver: Senna
- Location: Toronto
- Status: Offline
Re: WIP: Lotus 88 USA 1981 Elio De Angelis
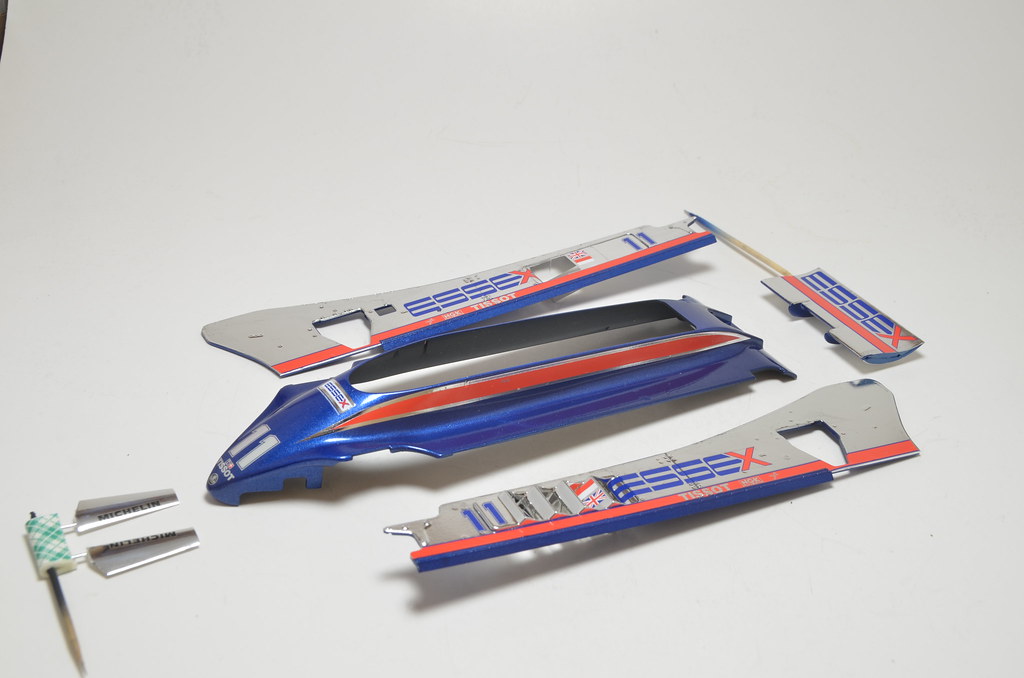
I've decided to go ahead and apply sponsor decals directly over chrome decals and over factory chromed parts.
It seems to worked fine. I had some edges of chrome decals to pop up. Used H30 clear to "pin" them down.
Hopefully all decals - livery and chrome will be ok after 2K clear. This will be next step.
If I had more time on my hands, I would actually put 2K clear over chrome decals first, to hold them down properly
and only apply sponsor decals later. But with lack of time for model building, I cut more corners recently.
Sergey's Blog - http://lezdep.blogspot.com/ | Public Gallery - http://picasaweb.google.com/lezdep
-
Eagle50
- FOTA Chairman
- Posts: 4038
- Joined: Sun Apr 03, 2011 12:05 pm
- Location: Tokyo Japan
- Status: Offline
Re: WIP: Lotus 88 USA 1981 Elio De Angelis
I can understand your decal apprehension, Sergey. I wonder if lightly clear-coating those big chrome decals, on all sides (even the edges) before applying the sponsor decals, would have helped hold them down. I sometimes count on clear, to keep my decal edges down.
Whatever, she looks great now! The colour scheme and decal placement are very attractive! Love that chrome-on-blue. The body panels are going to be fantastic around all your detailed "innards".
Cheers, Chris
Whatever, she looks great now! The colour scheme and decal placement are very attractive! Love that chrome-on-blue. The body panels are going to be fantastic around all your detailed "innards".
Cheers, Chris
-
 mazyen
- Best of the Rest

- Posts: 534
- Joined: Sat Sep 05, 2009 5:34 am
- Your Name: Lee Hoe Yen
- Favorite F1 Team or Driver: Lotus
- Location: Tanzania
- Contact:
- Status: Offline

Re: WIP: Lotus 88 USA 1981 Elio De Angelis
Be careful with the chrome plated parts, especially after you've done such a good job on the body panels. Mine is so badly plated that it got dissolved even by the decal softener.
In the end I've to apply the chrome decals over the chrome plated parts & I just use Klear over the completed decals in case the TS attacks the decals like on my MacHonda.
Cheers
Lee
In the end I've to apply the chrome decals over the chrome plated parts & I just use Klear over the completed decals in case the TS attacks the decals like on my MacHonda.
Cheers
Lee
-
lezdep
Topic author - FOTA Chairman
- Posts: 3623
- Joined: Tue Aug 23, 2005 2:42 am
- Favorite F1 Team or Driver: Senna
- Location: Toronto
- Status: Offline
Re: WIP: Lotus 88 USA 1981 Elio De Angelis
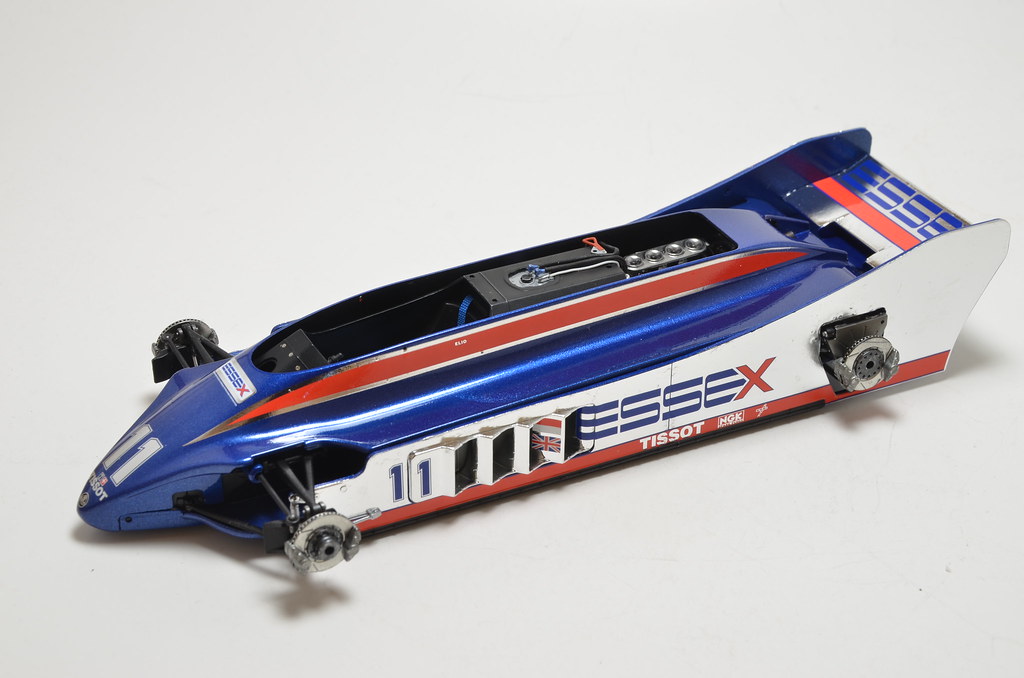
I ended up putting 2K clear on over the weekend. Worked fine. No issues with 2K.
Only thing - clear being clear, all the imperfections left from me handling chrome parts
and my application of H30 clear, which I used to fix chrome decals' edges down,
showed up from under 2K. Well, not very positive, but valuable experience gained
anyway.
Btw, while building up suspension of Ebbro Lotus 91 kit (which is really close to 88),
I realized that some of my issues with rear suspension alignment and height were self
inflicted. While setting down part B13, I was determined to get it onto main gearbox
shell with no gaps. So, I've made it wider and it sit lower with no gap to gearbox.
However that lead to a need to set E3 lower as well to align. I had to deepen groves
which went over E20 part. When I was doing same assembly on Lotus 91, I've realized
that part G30, which is equivalent of B13 in Lotus 88 kit, should not seat low on
gearbox case, but will have a little gap to gearbox's top. That allowed E1 (equiv. of E3
in Lotus 88) to seat on top of E13 without any changes, yet align properly with E11/E12.
As an end result, rear suspension will be easier to put over the floor and overall car will
seat lower at the rear. Unfortunately it is not possible to fix that issue for Lotus 88 by
now.
Sergey's Blog - http://lezdep.blogspot.com/ | Public Gallery - http://picasaweb.google.com/lezdep
-
lezdep
Topic author - FOTA Chairman
- Posts: 3623
- Joined: Tue Aug 23, 2005 2:42 am
- Favorite F1 Team or Driver: Senna
- Location: Toronto
- Status: Offline
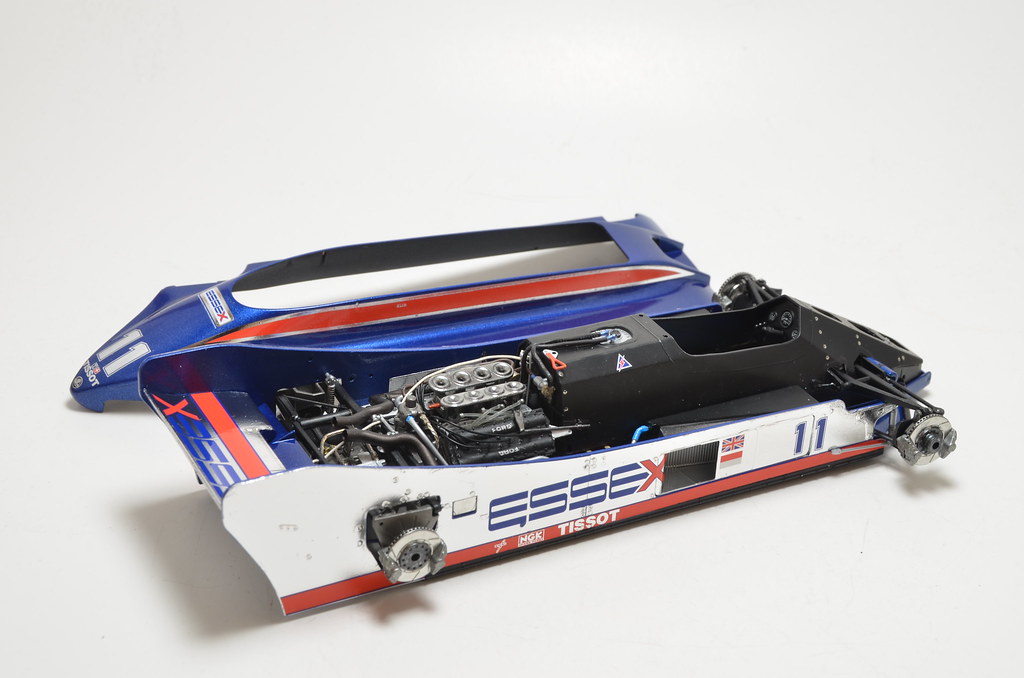
Re: WIP: Lotus 88 USA 1981 Elio De Angelis
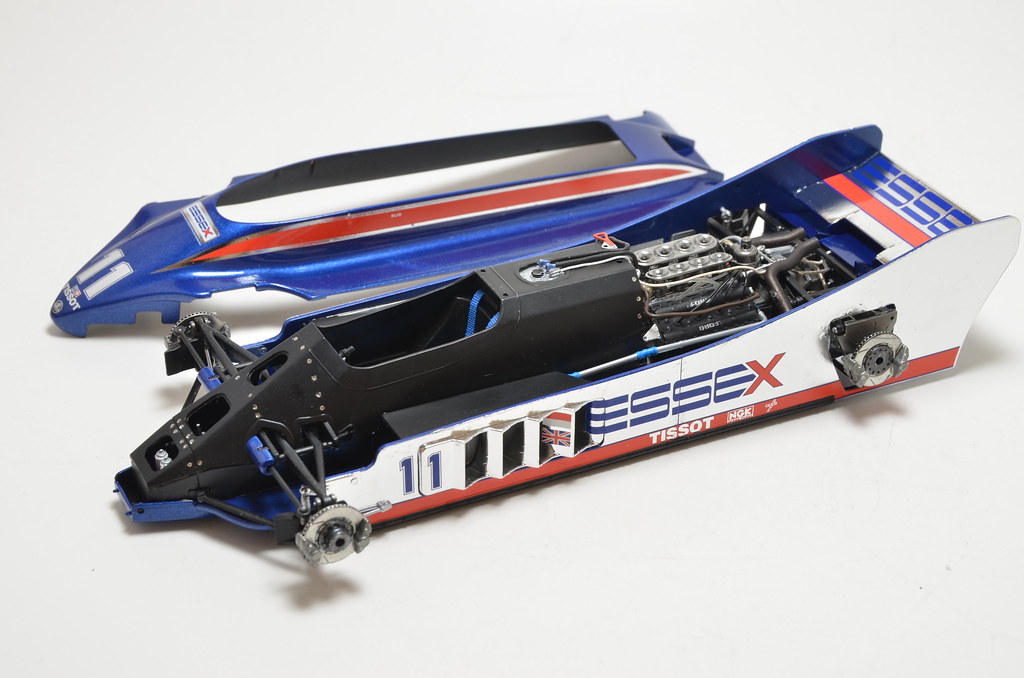
Work continued slowly on this model. It was basically waiting until I got motivation to mask over whole side panels to
paint bottom skirts black. I've done that few weeks ago and finally got to continue chassis assembly this weekend. Attached
side panels to the floor and put rear wings in place. Over all result is not bad. Not 100% square, because of warper floor, but
kind of ok visually. It is my first Ebbro kit to build and I am pleased with quality and detail level. Fit was pretty good. Only low
point is warped floor, which causes suspension and body panel's alignment to be off. Something is in the way of body cowling
as well, so it does not seat properly. But unless you look closely at the rear, it's not that apparent. Some photos of current state
are below. Number of accessories and some wirings are left to complete. Then only wind shield screen and wheels would be left
to finish it all off.
Sergey's Blog - http://lezdep.blogspot.com/ | Public Gallery - http://picasaweb.google.com/lezdep
-
- Similar Topics
- Replies
- Views
- Last post
-
- 2 Replies
- 185 Views
-
Last post by jorgeralvear
-
- 0 Replies
- 205 Views
-
Last post by eyckles