
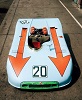
Jordan 191
-
 BigDuke6
- Major Constructor

- Posts: 1185
- Joined: Sun Feb 10, 2008 10:15 pm
- Location: Sydney, Aus
- Status: Offline
Re: Jordan 191
JK - Are you sure you aren't a mini Gary Anderson?
-
 craig
craig
- F2 Champion

- Posts: 193
- Joined: Sat May 25, 2002 6:24 pm
- Location: Montreal, QC Canada
- Status: Offline
Re: Jordan 191
this has to be the best WIP I've seen. With respect to everyone's work. Looking forward to every step.
Thanks for taking the time in sharing.
Thanks for taking the time in sharing.
-
 alexpayne
- FOTA Chairman

- Posts: 3361
- Joined: Mon Apr 14, 2003 4:17 pm
- Location: Oxford. UK
- Status: Offline
Re: Jordan 191
Amazing work,more like "plastic engineering",fantastic attention to detail.
Regards,Alex.
Regards,Alex.
-
43rdMichael
- FOTA Chairman
- Posts: 2610
- Joined: Thu May 12, 2005 9:43 pm
- Location: Melbourne, Australia
- Status: Offline
Re: Jordan 191
Thanks for the update Jaykay.
As others have noted, you're putting on another masterclass here! The level of engineering evident in your building is just awesome.
Inspirational and really enjoyable to watch!
All the best,
michael
As others have noted, you're putting on another masterclass here! The level of engineering evident in your building is just awesome.
Inspirational and really enjoyable to watch!
All the best,
michael
-
 cooperdalecz
- F2

- Posts: 74
- Joined: Tue May 26, 2009 1:33 am
- Status: Offline
Re: Jordan 191
An Excellent!
-
wilchan
- Best of the Rest

- Posts: 592
- Joined: Sun Nov 24, 2002 8:16 pm
- Your Name: Will C
- Favorite F1 Team or Driver: Mika Hakkinen, Jacque Villeneuve
- Location: CA
- Contact:
- Status: Offline

Re: Jordan 191
Unbelievable!!!!! Gosh how do you make PE part?
-- william
-- william
Visit my personal page: http://www.wilchan.com 
http://www.wilchan.com/j199/img_icon_1.jpghttp://www.wilchan.com/f2001/img_icon1.jpghttp://www.wilchan.com/m193/img_icon1.jpghttp://www.wilchan.com/r1/img_icon1.jpghttp://www.wilchan.com/f310b/img_icon1.jpghttp://wilchan.com/lotus_102/img_icon1a.jpg
http://www.wilchan.com/j199/img_icon_1.jpghttp://www.wilchan.com/f2001/img_icon1.jpghttp://www.wilchan.com/m193/img_icon1.jpghttp://www.wilchan.com/r1/img_icon1.jpghttp://www.wilchan.com/f310b/img_icon1.jpghttp://wilchan.com/lotus_102/img_icon1a.jpg
Re: Jordan 191
Thanks for the praise guys :-) Your replies are really appreciated!
@William: I made a description of the etching process i'm using in another build. You can check it here ( scroll down the page ):
http://www.automotiveforums.com/vbullet ... 745&page=4
@William: I made a description of the etching process i'm using in another build. You can check it here ( scroll down the page ):
http://www.automotiveforums.com/vbullet ... 745&page=4
Re: Jordan 191
Time for some more build progress.
I carried on working at the front end of the car. It was time for the suspension arms. I had to rework the lower front arms substantially. While I kept the rear chassis “connector” from Tamiya I had to change the one at the front because that will now be visible with the removable nose cone and should look like the original. Also the outer one had to be remade to connect to my new upright. I had to guess a bit because I don’t have enough pictures of that area but it seems to be the same sort of connection the McLaren MP4/4 has at the top of the front uprights so I built it accordingly.
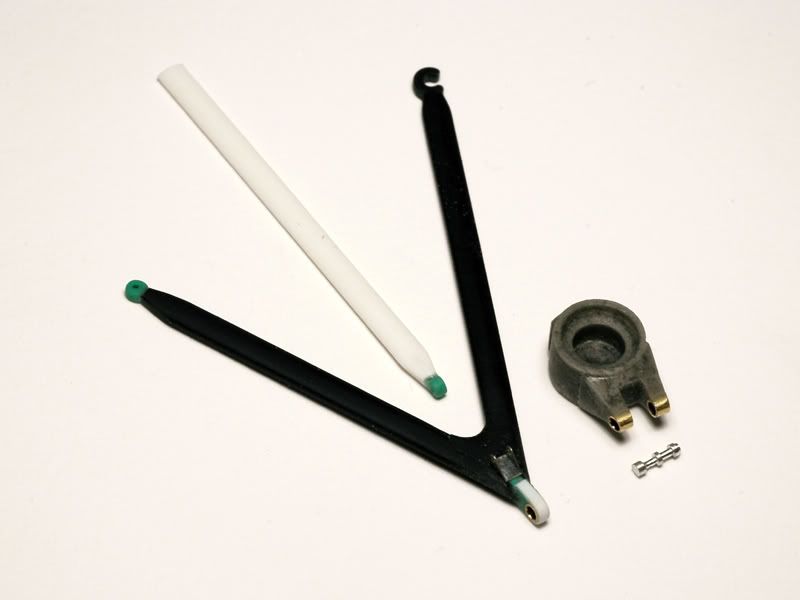
I used brass tubes for better strength and the little silver part is turned from aluminium.
The white part is the pushrod I scratch built from 1mm sheet styrene, because the kit ones weren’t long enough. That’s because the connection points of the suspension arms to the uprights are too close to the chassis on the kit parts. I made mine more like the real ones so the pushrods ended up being a bit short to later connect them to the front damper in the nose. I could have tried to extend the kit parts but making new ones wasn’t really more work.
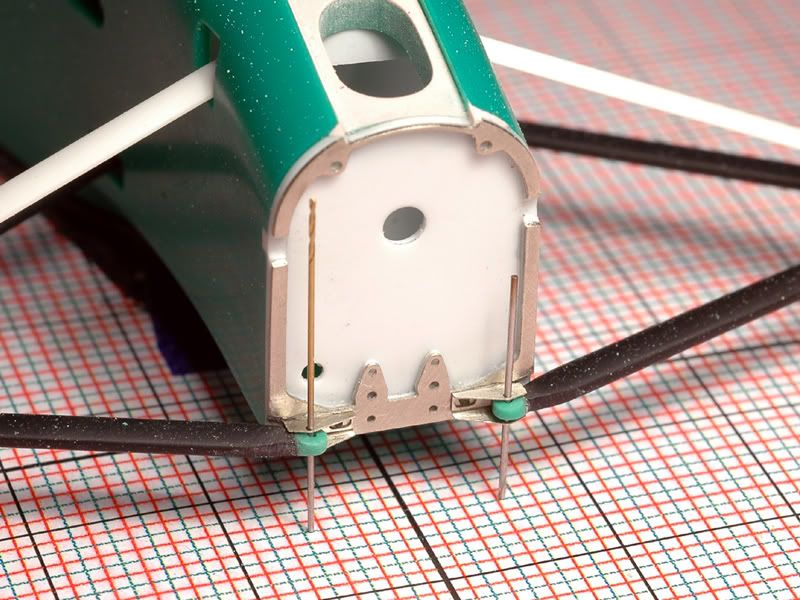
Next you see the arms held in place to the monocoque with two 0,4mm drills on photo etched brackets I made.
In the etched frame on the monocoque I also made two cutouts where the steering mechanism will later go.
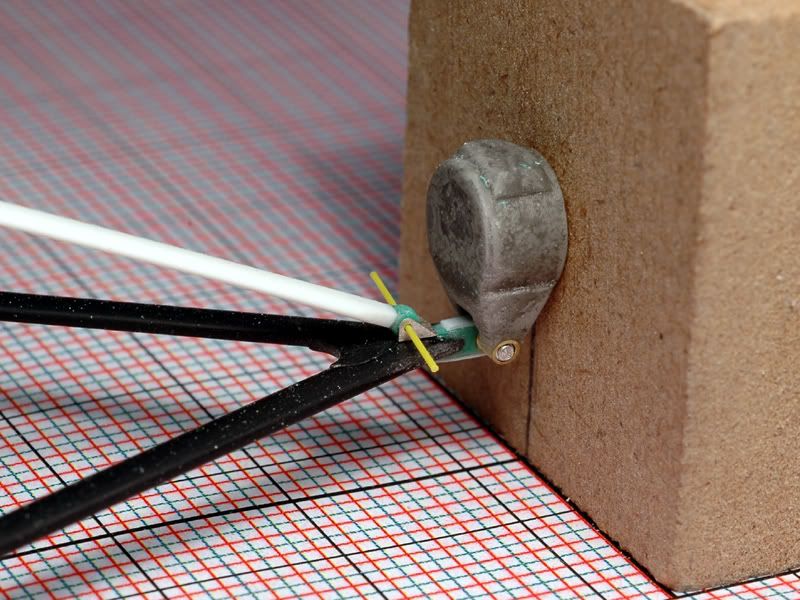
On the outside you have the arm connected to the upright which is held on the jig. The upright is connected to the arm with another etched bracket.
Finally here’s an overview with both sides dry mounted.
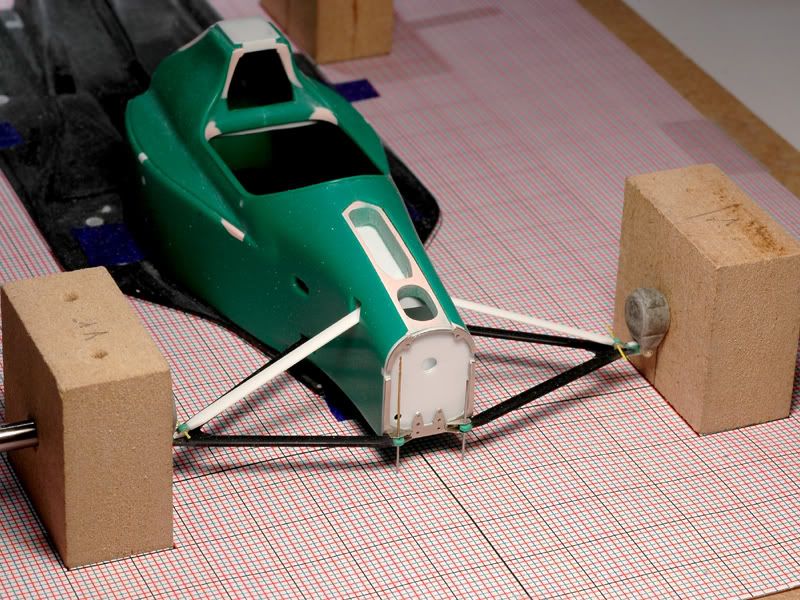
The jig was a really good thing to build. It doesn’t speed up the build but makes it more precise. Only because I had it for reference, did I notice that the lower arms were about 0,5mm too wide in the beginning. That sounds very small but 0,5mm in the wrong place can really screw the whole suspension geometry and make the car sit wrong in the end.
Now I will have to do the upper arms and steering arms which will be at least as much work...
Because I was a bit annoyed with the suspension arms I also started working on the brake ducts. In the kit they are typically for Tamiya an integral part of the upright as I showed you previously.
Mine are separate for ease of painting and decaling and simply because they’re like that on the real car :-) I used the kit parts, thinned them out from the inside and then closed the channels with sheet styrene and added the shapes that connect them to the upright and funnel the air with more styrene sheet a turned bit of renshape and some polyester putty.
Here are two views of the left side duct. Now I have to make a symmetric one for the right side….:-)

So much for now and thanks for looking!
I carried on working at the front end of the car. It was time for the suspension arms. I had to rework the lower front arms substantially. While I kept the rear chassis “connector” from Tamiya I had to change the one at the front because that will now be visible with the removable nose cone and should look like the original. Also the outer one had to be remade to connect to my new upright. I had to guess a bit because I don’t have enough pictures of that area but it seems to be the same sort of connection the McLaren MP4/4 has at the top of the front uprights so I built it accordingly.
I used brass tubes for better strength and the little silver part is turned from aluminium.
The white part is the pushrod I scratch built from 1mm sheet styrene, because the kit ones weren’t long enough. That’s because the connection points of the suspension arms to the uprights are too close to the chassis on the kit parts. I made mine more like the real ones so the pushrods ended up being a bit short to later connect them to the front damper in the nose. I could have tried to extend the kit parts but making new ones wasn’t really more work.
Next you see the arms held in place to the monocoque with two 0,4mm drills on photo etched brackets I made.
In the etched frame on the monocoque I also made two cutouts where the steering mechanism will later go.
On the outside you have the arm connected to the upright which is held on the jig. The upright is connected to the arm with another etched bracket.
Finally here’s an overview with both sides dry mounted.
The jig was a really good thing to build. It doesn’t speed up the build but makes it more precise. Only because I had it for reference, did I notice that the lower arms were about 0,5mm too wide in the beginning. That sounds very small but 0,5mm in the wrong place can really screw the whole suspension geometry and make the car sit wrong in the end.
Now I will have to do the upper arms and steering arms which will be at least as much work...
Because I was a bit annoyed with the suspension arms I also started working on the brake ducts. In the kit they are typically for Tamiya an integral part of the upright as I showed you previously.
Mine are separate for ease of painting and decaling and simply because they’re like that on the real car :-) I used the kit parts, thinned them out from the inside and then closed the channels with sheet styrene and added the shapes that connect them to the upright and funnel the air with more styrene sheet a turned bit of renshape and some polyester putty.
Here are two views of the left side duct. Now I have to make a symmetric one for the right side….:-)
So much for now and thanks for looking!

Re: Jordan 191
incredible !!!
Thanks for the update,
Thanks for the update,
-
 SteveNoble
- FOTA Chairman
- Posts: 2271
- Joined: Sun Jul 30, 2006 4:27 pm
- Location: Barnsley, UK
- Status: Offline